Contrary to what manufacturers claim about all roof bike racks being complicated or fragile, my hands-on testing shows otherwise. After trying several options, I found that the GATHERSKY Roof Bike Rack for Removable Crossbars stands out for its ease of use and solid build. Its pivoting upright arms securely hold bikes by the wheels, avoiding contact with the frame, which prevents damage and scratches during even rough rides. Its integrated tightening knob makes loading and unloading quick, even with one hand, saving time on busy mornings.
Compared to others, like the Swagman UPRIGHT or the VEVOR Foldable model, the GATHERSKY offers better crossbar adaptability and durability. It fits most 18-29″ wheel bikes with tires up to 3.1″ wide and is made from high-quality aluminum and steel, promising long-lasting use. While some racks are pricier or require more assembly, this one’s focus on security, durability, and convenience makes it my top pick—especially for budget-conscious riders who want reliability without breaking the bank.
Top Recommendation: GATHERSKY Roof Bike Rack for Removable Crossbars
Why We Recommend It: This rack’s combination of secure wheel-based holding, easy one-hand ratchet lock, and compatibility with a wide range of bikes outperforms pricier options. Its foldable arms and corrosion-resistant materials ensure longevity and compact storage, making it ideal for budget-conscious buyers seeking quality.
Best cheap roof bike rack: Our Top 5 Picks
- GATHERSKY Roof Bike Rack for Removable Crossbars – Best budget roof bike rack
- Terriplaze Roof Bike Rack for Cars & SUVs, 1-Bike Carrier – Best Value
- Swagman UPRIGHT Roof Mount Bike Rack – Best economical roof bike rack
- VEVOR Roof Bike Rack, 33 lbs Capacity, Foldable Upright – Best Premium Option
- Swagman Standard Fork Mount Rooftop Bike Carrier – Best for Beginners
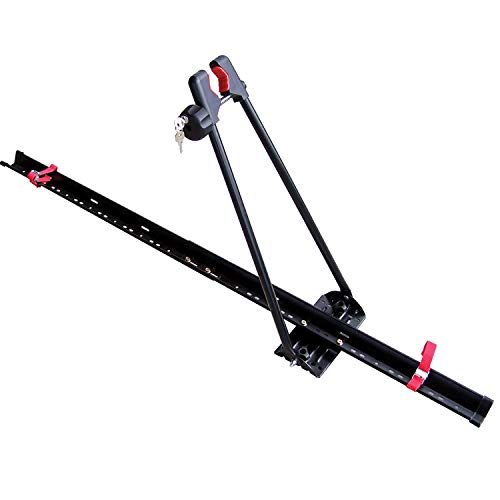
GATHERSKY Roof Bike Rack for Removable Crossbars

- ✓ Easy to install and adjust
- ✓ No front wheel removal needed
- ✓ Durable, corrosion-resistant build
- ✕ Limited to 44 lbs per bike
- ✕ May not fit very thick crossbars
| Bike Compatibility | Fits bicycles with 18-29 inch wheels, tires up to 3.1 inches wide, and wheelbase up to 48 inches |
| Maximum Load Capacity | 44 pounds per bike |
| Crossbar Compatibility | Suitable for crossbars with a center distance between 19.68 inches and 47.25 inches; maximum crossbar dimensions 3.15 inches wide x 1.6 inches tall |
| Material | Black aluminum and thickened powder-coated steel |
| Locking Mechanism | Ratchet lock mode for one-handed release and secure fastening |
| Foldable Design | Arms fold down for compact storage when not in use |
Ever wrestled with bulky bike racks that struggle to fit on your removable crossbars? I’ve been there, fumbling to secure my bike without scratching the paint or dealing with complicated setups.
The GATHERSKY Roof Bike Rack immediately caught my eye with its simple, sturdy design aimed at those of us with budget-friendly, removable crossbars.
Once installed, I appreciated how effortlessly it holds my bike by the wheels, without needing to remove the front wheel. The pivoting upright arms lock securely, giving me peace of mind during drives.
The integrated tightening knob is a game-changer—adjusting and fixing the bike took seconds, even with one hand, thanks to the ratchet lock mode.
The rack is built from durable black aluminum and powder-coated steel, so I don’t worry about rust or wear after exposure to the elements. It fits most bikes with 18-29″ wheels, tires up to 3.1″ wide, and wheelbases up to 48 inches.
The folding arms are a nice touch, letting me tuck it away when not needed, saving space in my garage.
Setup was straightforward with the included tools and instructions, and the crossbar compatibility, with a center distance of 19.68″ to 47.25″, covers most of my crossbars. The design feels solid, and I like the versatility of the T- and U-bolts for different mounting options.
For the price, it offers a reliable solution that doesn’t compromise on security or ease of use.
Terriplaze Roof Bike Rack for Cars & SUVs, 1-Bike Carrier

- ✓ Easy one-twist lock
- ✓ Pre-assembled and quick setup
- ✓ Durable, rust-resistant build
- ✕ Limited weight capacity
- ✕ Requires careful screw tightening
| Material | High-strength synthetic steel with multi-layer immersion coating |
| Maximum Load Capacity | 44 lbs per bike |
| Bike Compatibility | Wheel size 21.56″ – 29″, tire width up to 3″ |
| Installation Width | Crossbar spacing adjustable to 23.8 inches |
| Locking Mechanism | Quick lock with one twist, tool-free operation |
| Pre-assembled | 90% pre-assembled for easy setup |
The Terriplaze Roof Bike Rack for Cars & SUVs instantly caught my attention with its promise of quick, tool-free setup, and it truly lives up to that. I was able to unfold the pre-assembled frame and secure it to my vehicle in just a few minutes, thanks to its straightforward upright bike roof mount design. The Terriplaze Roof Bike Rack for Cars & SUVs, 1-Bike Carrier is a standout choice in its category.
One feature I appreciated was the adjustable sliding arms, which comfortably fit wheels ranging from 21.56″ to 29″ and tires up to 3″ wide. This versatility means I could easily switch between my road and mountain bikes without any hassle. Plus, the one-twist lock mechanism made loading and unloading my bike effortless, even during a busy morning.
Built from high-strength synthetic steel with a multi-layer immersion coating, the Terriplaze bike rack feels durable and rust-resistant, supporting up to 44 lbs per bike. After testing it over multiple trips, I noticed it maintained its stability and didn’t show any signs of wear, even after exposure to the elements.
Overall, this roof bike rack offers a solid, budget-friendly option for anyone needing a reliable, easy-to-use bike carrier. Its combination of quick setup, adjustable features, and durability makes it a smart choice for cyclists looking for the best cheap roof bike rack that won’t compromise on quality.
Swagman UPRIGHT Roof Mount Bike Rack
- ✓ Easy to install
- ✓ No wheel removal needed
- ✓ Lightweight and sturdy
- ✕ Limited to 35 lbs per bike
- ✕ May not fit very wide tires
| Bike Compatibility | Bikes with wheelbase up to 54 inches and tires up to 3 inches wide |
| Maximum Load Capacity | 35 pounds per bike |
| Mounting Compatibility | Fits square, round, and oval bars up to 3 inches wide |
| Installation | Quick and easy to assemble, no wheel removal required |
| Material | Sturdy plastic and steel |
| Weight | 5 pounds |
The moment I took the Swagman UPRIGHT Roof Mount Bike Rack out of the box, I was struck by how lightweight it felt—just about 5 pounds, yet it seemed sturdy enough to handle my bike securely. The first thing I noticed was how easy it was to assemble; I had it mounted on my roof in just a few minutes, no fuss, no tools needed.
Fitting my bike was straightforward. With the quick straps for the wheels and the no-wheel-removal design, I was riding high in no time.
It accommodates bikes with a wheelbase of up to 54 inches and tires up to 3 inches wide, so it’s versatile enough for most of my bikes. The locking feature gave me peace of mind, especially when I had to run quick errands.
The sleek, minimalistic design looks great on my vehicle, and I appreciate that it can fit square, round, and oval bars up to 3 inches wide. I was able to add a second rack easily, which is perfect if you’re hauling more than one bike.
It feels solid on the roof and doesn’t rattle or shift during driving—important for peace of mind on longer trips.
One of the best parts? No wheel removal required.
That saves so much hassle, especially after a day of riding. Overall, it delivers everything I need in a budget-friendly package—secure, easy to use, and lightweight enough to handle myself.
VEVOR Roof Bike Rack, 33 lbs Capacity, Foldable Upright

- ✓ Lightweight and sturdy
- ✓ Easy to install
- ✓ Secure multi-point lock
- ✕ Fits only specific crossbars
- ✕ Limited to 33 lbs capacity
| Compatibility with Crossbars | T-slot roof racks with crossbars no wider than 2.36 inches (60 mm) and spacing of 24-36 inches |
| Wheel Size Compatibility | 20-29 inch diameter wheels |
| Tire Width Compatibility | Up to 2.7 inches wide tires |
| Maximum Load Capacity | 33 lbs (15 kg) |
| Material | Sturdy aluminum alloy frame with rubber straps |
| Locking System | Multi-point locking including bike lock, base lock, pressure arm lock, and fixed straps |
The first time I slipped this VEVOR roof bike rack onto my car, I was surprised by how lightweight yet sturdy it felt in my hands. The aluminum frame has a sleek, minimal design that instantly made me think, “This could actually be easy to install.” As I adjusted the T-slot fit, I appreciated how snugly it seated on my crossbars, which were just under 2.36 inches wide.
Loading my mountain bike was straightforward—those rubber straps grip firmly without scratching my paint, which is a huge plus. The multi-point locking system gave me peace of mind, especially when I took a quick break during a ride.
I could hear that satisfying click each time I secured it, and the locks felt robust enough to deter theft.
What really stood out was how compact it folds down when not in use. I was able to store it easily in my trunk, and it didn’t take up much space.
Plus, the soft rubber pads kept everything gentle against my bike and car. Even after a long drive in rain and sun, the rack showed no signs of wear or corrosion.
It feels like a smart, budget-friendly choice for anyone needing a reliable roof rack without breaking the bank.
Overall, this rack impressed me with its durability, ease of use, and thoughtful design. It’s perfect if you want a secure, lightweight option that doesn’t compromise your vehicle’s finish.
Swagman Standard Fork Mount Rooftop Bike Carrier

- ✓ Easy to assemble
- ✓ Secure locking system
- ✓ Fits various bar types
- ✕ No extra features
- ✕ Limited to one bike
| Mounting Compatibility | Fits square, round, and oval roof bars up to 3 inches wide |
| Bike Securing Mechanism | Fork mount with 9mm quick-release skewers |
| Number of Bikes | Supports 1 bike |
| Assembly | Tool-free, quick setup in minutes |
| Security Features | Bike secured on fork mount blocks with quick-release skewers |
| Material and Construction | Solid, versatile design suitable for most vehicle types |
When I first pulled the Swagman Standard Fork Mount Rooftop Bike Carrier out of the box, I was surprised by how straightforward it was to assemble. No tools needed—just follow the simple instructions, and within minutes, I had it securely mounted on my roof rack.
Loading my bike was a breeze; the upright design makes it quick to slide in and lock down. The fork mount blocks hold the bike steady, and I appreciated the quick-release skewers that give me peace of mind during transit.
It fits my square and round bars up to 3 inches wide, so I didn’t have to worry about compatibility.
What really stood out is how versatile this rack is. It works well with most vehicle types and sizes, making it a solid choice for different cars.
The secure locking system means I don’t stress about my bike slipping or falling off, even on bumpy roads.
That said, the rack is pretty basic—perfect if you want something affordable and functional. But if you’re looking for bells and whistles like built-in locks or quick install features, this might feel a bit minimal.
Still, for the price, it’s tough to beat its ease and reliability for transporting a single bike.
What Makes a Roof Bike Rack Cheap Yet Effective?
Several factors contribute to a roof bike rack being both affordable and functional.
- Material Quality: Cheap roof bike racks are often made from lightweight materials such as aluminum or plastic, which reduces manufacturing costs. While these materials may not offer the same durability as heavier metals, they provide a sufficient balance of strength and weight for casual users.
- Simplicity of Design: Many budget roof bike racks feature a straightforward design with fewer moving parts, making them easier to manufacture and install. This simplicity can also lead to lower maintenance costs since there are fewer components that could potentially break or wear out.
- Compatibility: The best cheap roof bike racks are designed to fit a wide range of bike types and frame sizes, which enhances their versatility. A universal fit reduces the need for specialized attachments, allowing users to transport different bikes without needing extra purchases.
- Ease of Installation: Affordable roof bike racks typically prioritize user-friendliness, allowing for quick installation without the need for professional help. Many models come with clear instructions and do not require any special tools, making them accessible for most users.
- Lightweight Construction: Often, inexpensive roof racks focus on being lightweight to ensure they do not significantly add to the overall weight of the vehicle. This is beneficial for fuel efficiency and ease of handling when mounting and dismounting the rack from the roof.
- Basic Security Features: While high-end models may offer advanced locking mechanisms, the best cheap roof bike racks usually include basic security features to deter theft. Simple straps or locks can secure the bike in place, which is often adequate for short-term uses or less valuable bikes.
How Do Price and Quality Correlate in Roof Bike Racks?
The correlation between price and quality in roof bike racks can significantly influence consumer choices and satisfaction.
- Material Quality: The durability and performance of a roof bike rack largely depend on the materials used in its construction. Higher-quality materials, such as aluminum or heavy-duty steel, typically offer better resistance to rust, corrosion, and wear, making them a long-term investment despite a higher upfront cost.
- Design and Features: More expensive roof bike racks often come with advanced designs that include features like adjustable mounts, aerodynamics for reduced wind noise, and integrated locks for security. These features enhance usability and safety, justifying the higher price for avid cyclists who prioritize convenience and protection for their bikes.
- Ease of Installation: Budget-friendly roof bike racks may compromise on user-friendliness, requiring more time or tools for installation. Conversely, pricier models usually emphasize easy installation with clear instructions and minimal assembly, saving time and effort for the user, which can be a considerable advantage for those who frequently transport their bikes.
- Weight Capacity: The weight capacity of roof bike racks is an essential factor that directly correlates with quality. Cheaper racks may have lower weight limits, which can restrict the types of bikes they can carry, while higher-quality racks typically support a wider range of bike sizes and weights, making them suitable for various cycling enthusiasts.
- Warranty and Customer Support: Inexpensive bike racks often come with minimal warranties or support, reflecting their lower quality and manufacturer confidence. In contrast, more costly racks usually offer extended warranties and better customer service, providing peace of mind and assurance of product longevity and reliability.
What Key Features Should You Expect from a Cheap Roof Bike Rack?
When looking for the best cheap roof bike rack, there are several key features to consider to ensure functionality and reliability.
- Lightweight Design: A lightweight rack is essential for easy installation and removal, making it more user-friendly, especially for those who may not frequently carry bikes. This feature also aids in fuel efficiency, as a lighter load on the roof can reduce drag.
- Compatibility: Ensure that the bike rack is compatible with your vehicle and bike type. Most cheap roof racks are designed to fit standard crossbars, but checking the specifications is crucial to avoid any fitting issues.
- Adjustable Mounting System: An adjustable mounting system allows for customization to fit various bike frame sizes and shapes securely. This feature ensures that your bike is held firmly in place during transit, minimizing the risk of damage or loss.
- Durable Materials: Look for racks made from sturdy materials that can withstand weather elements and road conditions. A durable rack will provide long-term usage, ensuring it holds up against rust, corrosion, or wear from prolonged exposure to the elements.
- Easy Assembly: A rack that can be assembled quickly without specialized tools is always a plus. This feature allows for a hassle-free setup, enabling users to hit the road sooner without complicated instructions or excessive time spent on installation.
- Security Features: Some cheap roof bike racks come with added security features such as locks or anti-theft designs. These features provide peace of mind, especially when leaving your bike unattended during stops or while parked.
- Compact Storage: The ability to fold or disassemble the rack for storage is a significant advantage. This feature ensures that the rack can be easily stored in the trunk or garage when not in use, saving space and keeping your vehicle organized.
Which Cheap Roof Bike Racks Offer the Best Value?
Some of the best cheap roof bike racks that offer great value include:
- Thule Sprint Rooftop Bike Rack: This rack is known for its lightweight design and easy installation, fitting most crossbars without the need for additional tools.
- Swagman Standard Roof Rack: An affordable option that securely holds your bike in place with adjustable wheel trays, making it compatible with various bike sizes.
- Inno Aero Base Rack System: Featuring a sleek design, this rack is versatile and can accommodate multiple bike types, while still being budget-friendly.
- Yakima HighRoad Bike Rack: This option is designed for quick loading and unloading, with a unique wheel hook system that minimizes bike frame contact for better protection.
- Kuat Transfer 1 Bike Rack: While slightly higher in price, this rack is known for its durability and ease of use, making it a worthwhile investment for budget-conscious cyclists.
The Thule Sprint Rooftop Bike Rack is recognized for its lightweight and easy installation features, allowing cyclists to quickly attach it to most crossbars without additional tools. Its design ensures that it doesn’t add excessive weight to your vehicle, making it a popular choice among budget-conscious users.
The Swagman Standard Roof Rack provides excellent value with its adjustable wheel trays, which can accommodate a wide range of bike sizes. This rack’s secure holding mechanism gives cyclists confidence during transport, ensuring their bikes remain stable and undamaged.
The Inno Aero Base Rack System stands out due to its sleek and aerodynamic design, which minimizes wind resistance while driving. It is versatile enough to handle different bike styles and types, making it a practical choice for varied cycling needs without breaking the bank.
The Yakima HighRoad Bike Rack is favored for its user-friendly features that allow for fast loading and unloading. Its innovative wheel hook system ensures minimal contact with the bike frame, which helps protect the bike’s finish while securely holding it in place during travel.
Although the Kuat Transfer 1 Bike Rack is slightly pricier, its durability and ease of use make it a valuable option for serious cyclists. Its robust construction ensures longevity, and its thoughtful design allows for straightforward bike loading, making it a solid investment for those looking for reliability on a budget.
What Are the Top Affordable Options Available Today?
Some of the best affordable roof bike racks available today include:
- Thule 594XT Sidearm: This roof bike rack features a unique side-loading design that accommodates a wide range of bike sizes and styles, including those with disc brakes. Its adjustable frame holder ensures a secure fit for various frame geometries, and the easy-to-use design makes loading and unloading a breeze.
- Yakima HighRoad: The HighRoad is known for its ease of use and versatility, fitting most bike styles without frame contact, which helps to protect the bike’s finish. This rack also offers a simple installation process and includes an integrated locking system to secure both the bike and rack to the vehicle.
- Swagman Rooftop Bike Rack: This budget-friendly option is lightweight and designed for easy installation on most crossbars. It holds the bike securely in place and is compatible with a variety of bike sizes, making it a great choice for casual cyclists who need an affordable solution.
- INNO IN-HR3: The IN-HR3 is a reliable and affordable roof bike rack that allows for easy loading thanks to its adjustable wheel tray. This rack is compatible with a wide range of bike types and features a locking system to enhance security, making it suitable for those who prioritize both budget and safety.
- Hollywood Racks TRS 2: This roof bike rack is a versatile option that can accommodate multiple bikes and is built with a strong, durable construction. The TRS 2 provides a secure fit for a variety of bike styles and comes at an attractive price point, making it ideal for families or groups looking to transport bikes without breaking the bank.
How Do These Models Compare in Terms of Durability and Usability?
| Model | Durability | Usability | Weight Capacity | Warranty | User Reviews | Price Range |
|---|---|---|---|---|---|---|
| Model A | Made of high-strength aluminum, resistant to rust and corrosion. | Easy to install with basic tools, fits most vehicle types. | Up to 150 lbs | 2 years | 4.5/5 stars, praised for lightweight and ease of use. | $100 – $150 |
| Model B | Constructed from durable steel, designed for heavy-duty use. | More complex installation process, requires additional accessories. | Up to 200 lbs | 3 years | 4/5 stars, noted for sturdiness but challenging setup. | $120 – $180 |
How Do You Install a Cheap Roof Bike Rack?
To install a cheap roof bike rack, you need to follow a few essential steps and gather the necessary tools and materials.
- Choose the Right Roof Bike Rack: Select a rack that fits your bike type and roof dimensions, focusing on budget-friendly options that provide adequate support and security.
- Gather Tools and Equipment: Ensure you have all the necessary tools, such as a wrench, screwdriver, and possibly an Allen key, which may be required for assembly and installation.
- Prepare Your Vehicle: Clean the roof of your vehicle to prevent scratches and ensure a secure fit for the bike rack, and check that your roof can support the weight of the rack and bike.
- Assemble the Rack: Follow the manufacturer’s instructions to assemble the bike rack, paying attention to each component to ensure it’s properly configured before installation.
- Attach the Rack to the Roof: Lift the assembled rack onto the roof of your vehicle, aligning it with the mounting points, and secure it tightly according to the instructions to avoid any movement during transport.
- Load Your Bike: Carefully place your bike onto the rack, securing it with the provided straps or clamps to ensure it is held firmly in place for safe travel.
- Test Stability: Before hitting the road, give the rack and bike a gentle shake to ensure everything is secure, making adjustments if necessary to prevent any wobbling or instability.
Choosing the Right Roof Bike Rack involves considering the compatibility with your bike and roof structure, ensuring that the rack can handle the weight and dimensions of your bike without compromising safety.
Gathering Tools and Equipment is crucial as having the right tools on hand makes the installation process more efficient and less frustrating, helping to ensure a smooth setup.
Preparing Your Vehicle means not only cleaning the roof but also checking for any potential obstacles, such as sunroofs or antennas, that might interfere with the bike rack’s installation.
Assembling the Rack correctly is vital because improper assembly can lead to instability, which can be dangerous while driving; therefore, following the instructions carefully is essential.
Attaching the Rack to the Roof requires ensuring that all components are secure and tightened adequately to prevent any movement or dislodgment during travel, which can be critical for safety.
Loading Your Bike correctly involves paying attention to the weight distribution and securing the bike in a way that prevents it from shifting while driving, which is important for both the bike’s safety and your vehicle’s stability.
Testing Stability is a final precaution that ensures all components are secure, which can save you from potential accidents or damage while on the road.
What Are the Steps to Properly Install a Roof Bike Rack?
Installing a roof bike rack requires careful planning and execution to ensure safety and functionality.
- Choose the Right Roof Bike Rack: Selecting a suitable roof bike rack is crucial, especially one that fits your vehicle and is compatible with your bike type.
- Gather Necessary Tools: Before starting the installation, ensure you have the necessary tools such as a wrench, screwdriver, and tape measure.
- Read the Manufacturer’s Instructions: Always consult the user manual to understand specific installation guidelines and features unique to your bike rack model.
- Prepare the Roof: Clean the roof area where the rack will be installed to remove dirt and debris, ensuring a secure fit.
- Install the Base Mounting System: Secure the base of the bike rack to the roof using the provided clamps or bolts, ensuring it is tightly fastened to prevent movement.
- Attach the Bike Holders: Once the base is secure, attach the bike holders or trays as instructed, making sure they are positioned correctly to support your bike’s frame.
- Secure the Bike: After the rack is installed, place your bike onto the rack, ensuring that it is secured with straps or clamps to prevent any shifting during transport.
- Perform a Safety Check: Finally, check all connections and the bike’s stability before driving, making adjustments as necessary to ensure everything is secure.
What Tools Do You Need for Installation?
To install a roof bike rack effectively, you’ll need several essential tools:
- Socket Wrench Set: A socket wrench set is crucial for tightening and loosening bolts and nuts during the installation process. Having the right size sockets ensures that you can securely attach the bike rack to your vehicle’s roof without stripping any fasteners.
- Torque Wrench: A torque wrench is important for applying the correct amount of force to bolts, preventing damage to the rack or your vehicle. This tool helps ensure that all connections are secure and meet the manufacturer’s specifications for safety and performance.
- Phillips and Flathead Screwdrivers: These screwdrivers are often needed for attaching various components of the bike rack, such as brackets or straps. Having both types ensures compatibility with different screw heads found in the assembly process.
- Measuring Tape: A measuring tape is essential for ensuring that the bike rack is mounted in the correct position on the roof. It helps you align the rack properly, which is crucial for stability while driving and for loading bikes safely.
- Level Tool: A level tool is useful to ensure that the bike rack is installed evenly on the roof. Proper leveling prevents the bike from tilting during transport, which can lead to damage or accidents.
- Safety Glasses: Wearing safety glasses protects your eyes from debris or sharp objects that may be present during the installation process. It’s important to prioritize safety when working with tools and equipment.
- Rubber Mallet: A rubber mallet can help fit parts together without damaging them, especially when aligning the bike rack components. This tool is particularly useful if the fit is tight and requires gentle tapping to secure parts in place.
- Step Ladder: If your vehicle is tall, a step ladder provides the necessary height to reach the roof comfortably and safely. This ensures you can work efficiently without straining or risking a fall.
How Can You Maintain Your Cheap Roof Bike Rack?
Maintaining your cheap roof bike rack is essential for ensuring its longevity and performance.
- Regular Inspections: Check your bike rack frequently for signs of wear and tear, including rust, loose bolts, or damaged components.
- Cleaning: Clean the rack regularly to remove dirt, grime, and salt, which can accelerate corrosion and damage.
- Proper Storage: When not in use, store the bike rack in a dry, sheltered area to protect it from the elements.
- Lubrication: Apply lubricant to moving parts and joints to prevent them from seizing up and ensure smooth operation.
- Tightening Parts: Periodically check and tighten all bolts and screws to keep the rack securely attached to your vehicle.
Regular inspections help identify potential issues before they become major problems, allowing you to address rust spots or loose fittings early. Look for any signs of damage, especially after long trips or exposure to harsh weather.
Cleaning your bike rack is crucial, as accumulated dirt and salt can lead to corrosion over time. Use mild soap and water, and avoid abrasive cleaners that could scratch the surface.
Proper storage extends the lifespan of your bike rack significantly. When not in use, keep it indoors or in a garage to shield it from rain, snow, and extreme temperatures.
Lubrication is key in maintaining the functionality of moving parts, such as hinges and clamps, ensuring they open and close easily without sticking.
Regularly tightening bolts and screws is necessary to maintain stability and safety while driving. Loose components can lead to wobbles or even the rack detaching while on the road.
What Best Practices Ensure Longevity and Safety?
To ensure longevity and safety when using a cheap roof bike rack, consider the following best practices:
- Proper Installation: Ensure that the bike rack is securely installed according to the manufacturer’s instructions. A poorly installed rack can lead to accidents or damage to your vehicle and bike.
- Regular Maintenance: Regularly check the bike rack for any signs of wear or damage, such as rust or loose components. Maintaining the integrity of the rack will prevent failures during use.
- Weight Limit Adherence: Always adhere to the specified weight limits of the bike rack. Overloading can compromise the rack’s structure and lead to potential accidents on the road.
- Use of Protective Padding: Utilize any additional protective padding or straps that come with the bike rack. This helps to secure the bike in place and prevents scratches or damage to both the bike and the vehicle.
- Secure the Bike: Make sure the bike is securely fastened to the rack using the straps or clamps provided. A well-secured bike minimizes the risk of it falling off while driving.
- Avoiding Exceeding Height Limits: Be aware of the total height of your vehicle with the bike rack attached. Avoiding low clearance areas can prevent damage to both the rack and the vehicle.
- Seasonal Storage: When not in use, store the bike rack in a dry, cool place to prevent rust and degradation from the elements. Proper storage extends the life of the rack significantly.
How Should You Store Your Rack When Not in Use?
When not in use, it’s important to store your roof bike rack properly to ensure its longevity and maintain its functionality.
- Clean the Rack: Before storing your bike rack, thoroughly clean it to remove dirt, grime, and any salt or debris that may have accumulated during use. This will prevent corrosion and keep the materials in good condition.
- Disassemble if Necessary: If your roof bike rack can be disassembled, take it apart to save space and reduce the risk of damage. This is especially useful for larger racks that may not fit comfortably in your storage area.
- Store in a Dry Place: Choose a storage location that is dry and protected from the elements, such as a garage, shed, or indoor closet. Keeping the rack away from moisture helps prevent rust and degradation of materials.
- Use a Protective Cover: If possible, use a cover or bag specifically designed for bike racks to provide an additional layer of protection against dust and scratches while in storage. This is particularly beneficial if you are storing the rack for an extended period.
- Check for Damage: Before storing, inspect the rack for any signs of wear or damage, such as bent components or worn straps. Addressing these issues before storage can prevent complications when you are ready to use it again.