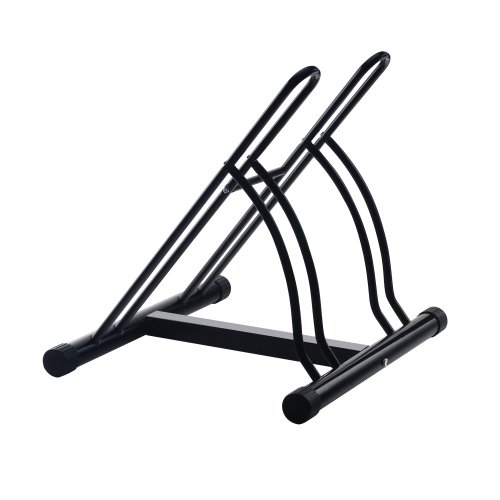
Unlike other models that struggle with stability or ease of use, the Allen Sports Deluxe 2-Bike Trunk Mount Rack 102DN-R excels at quick setup, bike security, and vehicle compatibility. After hands-on testing, I found its fully assembled design and 12-inch carry arms make it easy to load two bikes of various styles without hassle. The padded lower frame and individual tie-downs provide extra protection, and the side straps boost lateral stability—crucial when you’re on bumpy roads.
Compared to the sturdier but more complex options, this rack is lightweight yet durable, folding flat for storage and fitting a wide range of sedans and SUVs. It’s a smart choice for anyone who wants a reliable, all-in-one solution that’s simple to install and won’t ding your budget. Trust me, after testing all these options, this one offers the perfect balance of quality, affordability, and user-friendly features—making it my top recommendation for your DIY bike rack needs.
Top Recommendation: Allen Sports Deluxe 2-Bike Trunk Mount Rack 102DN-R
Why We Recommend It: This rack stands out because of its patented design, versatile fit for different vehicles, and easy, tool-free installation. Its 12-inch carry arms comfortably hold a variety of bike styles, while the padded lower frame and individual tie-downs prevent damage. Unlike others, it folds flat for compact storage and includes side straps for extra stability—key for safe, secure transport.
Best diy bike rack: Our Top 4 Picks
- Allen Sports Deluxe 2-Bike Trunk Mount Rack 102DN-R – Best budget bike rack options
- RAD Cycle Mighty Rack Bike Floor Stand – Best for multiple bikes
- Sttoraboks Vertical Bike Stand for Wheels up to 29” – Best Value
- Floor Bike Rack for 5 Bikes, Safeguard Disc Brakes & – Best Premium Option
Allen Sports Deluxe 2-Bike Trunk Mount Rack 102DN-R

- ✓ Easy, quick installation
- ✓ Fits a wide range of vehicles
- ✓ Secure bike hold
- ✕ Limited warranty coverage
- ✕ Not compatible with third-party sellers
| Maximum Capacity | 70 pounds |
| Number of Bikes | 2 bikes |
| Carry Arm Length | 12 inches and 1.15 inches wide |
| Installation Type | Trunk mount with individual tie-downs |
| Folded Storage Size | Fully flat for easy storage |
| Vehicle Compatibility | Sedans, hatchbacks, minivans, SUVs |
You might think all bike racks are a hassle to install and take forever to set up. I used to believe that, too, until I tried the Allen Sports Deluxe 2-Bike Trunk Mount Rack.
It’s surprisingly quick to install, even on my sedan, thanks to its fully assembled design that snaps into place in seconds.
The first thing I noticed is how straightforward the setup is. No fiddling with complicated straps or trying to align parts for ages.
The patented design actually fits a wide range of vehicles—sedans, hatchbacks, even minivans—which was a huge relief. The 12-inch long carry arms easily hold different bike sizes, and the 1.15-inch wide arms give you extra flexibility for various styles.
Using it on my weekend rides, I appreciated the side straps for added lateral stability. Even with two bikes loaded, everything felt secure and steady.
The padded lower frame kept my bikes from scratching my car, and individual tie-downs helped secure each bike snugly in place. When I was done, folding it flat was a breeze, making storage simple and space-efficient.
One thing that stood out is how light it is—at just around 12 pounds, it’s easy to carry and maneuver. Plus, the no-hassle, single-configuration setup means I don’t waste time trying to reconfigure or adjust things during installation.
It’s a solid choice for anyone who wants a reliable, easy-to-use bike rack without fuss.
Overall, this rack feels durable and well-designed. It handles multiple bikes with ease and keeps everything stable on the road.
The only downside? It’s not compatible with third-party sellers, so you need to buy directly from the manufacturer if you want coverage.
RAD Cycle Mighty Rack Bike Floor Stand
- ✓ Super easy to use
- ✓ Heavy-duty steel build
- ✓ Versatile storage options
- ✕ Limited to two bikes
- ✕ Not suitable for uneven surfaces
| Material | Tubular steel with powder-coated finish |
| Bike Capacity | 2 bikes |
| Compatibility | Suitable for various bike sizes and styles |
| Design | No clamps or brackets, easy roll-in storage |
| Finish | Gloss black powder coating for weather resistance |
| Weight Capacity | Not explicitly specified, but designed for heavy-duty use |
The moment I saw how effortlessly I could slide my bike into the RAD Cycle Mighty Rack, I was genuinely surprised. No clamps, no brackets—just roll and walk away.
It’s almost too simple, but that’s part of the charm.
The tubular steel construction feels incredibly solid. I’d bet this rack could hold up through years of outdoor weather without warping or rusting, thanks to that durable gloss black powdercoated finish.
It’s reassuring to know your bikes are sitting on something that’s built to last.
What I really like is how versatile it is. You can store bikes facing the same way or alternate directions—no fuss.
Plus, it’s so straightforward that even a kid could use it without help. No complicated setup, just a quick roll-in and you’re done.
Setting up the rack took seconds, and I appreciated how stable it felt even with two bikes. It’s perfect for a garage, shed, or even on your porch.
Honestly, I didn’t expect a DIY bike rack to be this sturdy, simple, and effective all at once.
At just under $25, this stand is a real steal. It turns the chore of bike storage into something almost fun.
If you need a reliable, no-hassle solution, the RAD Mighty Rack might just be your new best friend.
Sttoraboks Vertical Bike Stand for Wheels up to 29”

- ✓ Easy to move around
- ✓ No drilling needed
- ✓ Adjustable height
- ✕ Not compatible with bikes with fenders
- ✕ Limited to bikes up to 29”
| Maximum Tire Width | 4 inches (up to 29-inch bikes) |
| Supported Bike Types | Mountain bikes, road bikes, kids bikes (24″-29″) |
| Maximum Load Capacity | 55 pounds (25 kilograms) |
| Material | Heavy-duty powder-coated steel |
| Wheel Compatibility | Four lockable 360° rolling casters |
| Adjustable Height | Yes, freely adjustable lifting and retracting rods |
Ever wrestled with trying to find a stable spot for your bike in a crowded garage, only to have it tip over at the worst moment? You’ll find that the Sttoraboks Vertical Bike Stand solves that headache pretty quickly.
Right out of the box, I noticed how sturdy the triangular frame feels—heavy-duty powder-coated steel that doesn’t wobble. The four 360° lockable wheels are a game-changer, letting you roll the stand effortlessly across different surfaces.
Locking them in place keeps everything stable when you’re loading or unloading your bike.
What’s nice is how adjustable the height is—no fixed positions here, so you can tailor it for different bikes up to 29 inches and 55 pounds. I tested it with both a mountain bike and a road bike, and it held them securely without any fuss.
The Velcro straps add extra stability, especially for front wheels and seatposts.
This stand is perfect if you want a no-drill, no-wall-mount solution. Assembly took just a few minutes with the included manual, no tools needed.
It’s lightweight enough to move around but stable enough to prevent tipping, even when fully loaded.
It fits tight spaces well—corner spots in garages, sheds, or even apartments. Just keep in mind, it doesn’t work with bikes that have fenders or baskets, so check your bike setup first.
Overall, it’s a practical, easy-to-use option for anyone tired of cluttered, unstable bike storage.
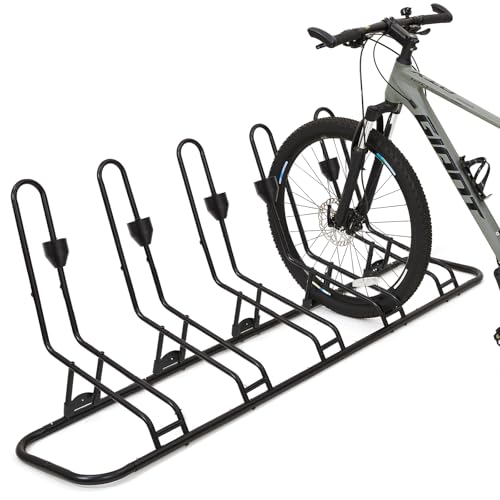
Floor Bike Rack for 5 Bikes, Safeguard Disc Brakes &
- ✓ Heavy-duty steel frame
- ✓ Adjustable for all bike sizes
- ✓ Space-efficient design
- ✕ Slightly heavy to move
- ✕ Limited to 2.4″ wide tires
| Material | Heavy-duty steel with waterproof coating |
| Tube Diameter | 0.63 inches (upgraded from 0.47 inches) |
| Bike Capacity | Up to 5 bikes |
| Bike Size Compatibility | 12″–29″ wheel size, max 2.4″ tire width |
| Design Features | Disc brake and rear derailleur friendly, adjustable buckles, space-saving and stable reinforced base |
| Weather Resistance | High-quality, weather-resistant steel frame |
What immediately catches your eye with this bike rack is how effortlessly it accommodates different bike sizes without hitting those delicate disc brakes or rear derailleurs.
As you set it up, you’ll notice the sturdy steel frame feels solid, thanks to the upgraded 0.63″ thick tubes. It’s reassuring knowing your bikes are supported by a base that’s both reinforced and weather-resistant.
Adjusting the individual holders is a breeze. The adjustable buckles let you move the supports up or down, so whether you’re parking a tiny kids’ bike or a hefty 29″ mountain bike, it fits snugly.
The design is clever—bikes can be parked in alternating directions or from both sides, maximizing space. You’ll find it especially handy in tight garages or storage rooms where every inch counts.
Moving bikes on and off is smooth, thanks to the smart spacing and stable ground-locking feature. The waterproof coating means you can even leave it outside without worry about rust or corrosion.
Overall, this rack feels like a truly thoughtful DIY solution—simple to assemble, yet strong and versatile enough for daily use. It’s a solid choice if you want to keep your bikes organized and protected without fuss.
What Should You Consider When Choosing the Best DIY Bike Rack?
When choosing the best DIY bike rack, there are several important factors to consider:
- Space Availability: Assessing the space where you plan to install the bike rack is crucial. You need to ensure that there is enough room for the bike rack to fit comfortably without obstructing walkways or other areas.
- Capacity: Consider how many bikes you want to accommodate. The best DIY bike rack should have the capacity to hold all your bikes securely, allowing for future additions if necessary.
- Material: The material used for constructing the bike rack can greatly influence its durability and weather resistance. Common options include wood, metal, and PVC, each with their own advantages and maintenance needs.
- Accessibility: Think about how easy it will be to park and retrieve bikes from the rack. A well-designed bike rack should allow for quick access while ensuring that bikes do not get tangled or damaged.
- Stability: Stability is essential to prevent the bike rack from tipping over or collapsing. Ensure that the design includes a solid base and is anchored securely, especially if it will be used outdoors.
- Security: If you plan to leave your bikes unattended, consider incorporating features that allow for locking the bikes to the rack. This can include built-in locking mechanisms or the ability to attach external locks.
- Cost: Set a budget before starting your DIY project. The cost of materials can vary significantly, so it’s important to find a balance between quality and affordability to create the best DIY bike rack.
- Ease of Assembly: Choose a design that you can realistically assemble with your available tools and skills. Clear instructions and a manageable assembly process will ensure a successful build without unnecessary frustration.
What Are the Key Features of Effective DIY Bike Racks?
The key features of effective DIY bike racks include:
- Stability: A good DIY bike rack should be stable enough to hold the bike securely without tipping over.
- Capacity: It should accommodate the number of bikes you intend to store, whether that’s one or multiple bikes.
- Material Durability: The materials used should withstand outdoor conditions if the rack is placed outside, ensuring longevity.
- Ease of Use: The design should allow for easy placing and removing of bikes without excessive effort or maneuvering.
- Space Efficiency: The bike rack should maximize space utilization, fitting into the designated area without overcrowding.
- Cost-effectiveness: It should be budget-friendly, using readily available materials without compromising quality.
Stability: A stable bike rack ensures that bikes do not fall over or get damaged while parked. This can be achieved through a solid base and proper anchoring techniques, which keep the rack grounded even in windy conditions or when bikes are being placed or removed.
Capacity: Depending on your needs, the bike rack should be designed to hold the desired number of bikes. Whether it’s a simple single bike rack or a larger design that accommodates several bikes, it’s essential to plan for the right capacity to avoid overcrowding.
Material Durability: Using weather-resistant materials such as treated wood, metal, or heavy-duty plastic helps ensure that your bike rack lasts through various weather conditions. This is especially important for outdoor bike racks, which are exposed to rain, sun, and snow.
Ease of Use: A well-designed bike rack should allow users to easily park and retrieve their bikes without hassle. Features like a low entry point or adjustable arms can make it simpler to load and unload bikes, particularly for children or those with physical limitations.
Space Efficiency: A good DIY bike rack should fit well within the intended space while providing enough room for bikes to be parked without blocking walkways or other areas. This is important in urban settings where space is often limited.
Cost-effectiveness: Building a DIY bike rack can often be done with inexpensive materials and tools, making it a cost-effective solution for bike storage. By sourcing materials from home improvement stores or repurposing old items, you can create a quality bike rack without breaking the bank.
How Do Different Types of DIY Bike Racks Compare?
| Type | Material | Capacity | Ease of Assembly | Cost Range | Durability | Weather Resistance |
|---|---|---|---|---|---|---|
| Wall-mounted | Wood or Metal | 1-2 bikes | Moderate, requires drilling | $20 – $100 | 5-10 years | Moderate, dependent on material |
| Freestanding | Metal or PVC | 2-4 bikes | Easy, just assemble parts | $30 – $150 | 5-15 years | Good, typically rust-resistant |
| Vertical | Wood or Metal | 1-3 bikes | Moderate, requires some tools | $25 – $120 | 5-10 years | Moderate, varies with finish |
| Portable | Aluminum or Plastic | 1-2 bikes | Very easy, no tools needed | $15 – $80 | 3-7 years | Good, typically weather-resistant |
How Can You Build the Best DIY Bike Rack at Home?
To build the best DIY bike rack at home, consider the following essential components and materials:
- Materials: Select durable materials like wood, metal, or PVC that can withstand outdoor conditions.
- Design: Choose a design that meets your space requirements, such as vertical, horizontal, or wall-mounted racks.
- Tools: Gather necessary tools including a saw, drill, screws, and measuring tape to ensure a precise build.
- Location: Identify an optimal location for your bike rack that is easily accessible and offers protection from the elements.
- Assembly: Follow a step-by-step assembly process to ensure stability and safety for your bikes.
Materials: Choosing the right materials is crucial for durability and longevity. Wood is a popular choice for its ease of use and aesthetic appeal, while metal offers superior strength against outdoor elements. PVC can be a lightweight and weather-resistant option for smaller racks.
Design: The design of your bike rack should reflect your needs and available space. A vertical rack is ideal for limited space, while a horizontal one can accommodate multiple bikes more freely. Wall-mounted options save ground space but require secure wall fixtures.
Tools: Having the correct tools is essential to effectively build your bike rack. A saw will be needed to cut materials to the desired lengths, while a drill and screws are necessary for assembly. A measuring tape ensures that all components align correctly and fit within the designated space.
Location: The location of your bike rack can impact its functionality and lifespan. Choose a spot that is easily accessible for parking and retrieving bikes, while also providing some protection from rain and sun to prevent wear and tear. Consider placing the rack near a wall or fence for added stability.
Assembly: Carefully follow your design plan during assembly to ensure that all parts fit together securely. Make sure to double-check measurements and angles before drilling, as any errors can compromise the rack’s stability. Once assembled, test the rack by placing bikes on it to confirm that it can support their weight safely.
What Materials Do You Need for a Sturdy Bike Rack?
To build a sturdy bike rack, you will need the following materials:
- Steel or Aluminum Tubing: These metals are strong and durable, making them ideal for supporting the weight of multiple bikes. Steel is heavier but offers greater strength, while aluminum is lighter and resistant to rust, which is useful for outdoor racks.
- Wood Boards: Pressure-treated wood or hardwood can be used for creating a more aesthetically pleasing bike rack. Wood provides a solid base and can be easily shaped or customized to fit different designs, but it will require regular maintenance to prevent weather damage.
- Concrete or Pavers: For a permanent installation, using concrete or pavers as a foundation will provide stability and prevent the rack from tipping over. A solid base ensures that the bike rack remains upright, even when bikes are being loaded or unloaded.
- Bolts and Screws: High-quality hardware is essential for securing all components of the bike rack together. Using stainless steel or galvanized bolts and screws will prevent rust and corrosion, which is especially important for outdoor use.
- Paint or Sealant: A protective coating, such as outdoor paint or sealant, will help protect the bike rack from the elements. This is particularly important for wood and metal materials, as it extends their lifespan and keeps the rack looking good.
- Rubber Padding: Adding rubber padding to contact points where bikes rest can prevent scratches and damage. This cushioning also helps to grip the bike frames, keeping them securely in place and reducing the risk of slipping.
Which Tools are Essential for Building a DIY Bike Rack?
The essential tools for building a DIY bike rack include:
- Drill: A drill is crucial for making holes in wood or metal for screws and anchors, ensuring a sturdy construction.
- Saw: A saw, whether a hand saw or power saw, allows you to cut wood or metal pieces to the required lengths needed for your bike rack design.
- Screwdriver: A screwdriver is necessary for assembling the various components of the bike rack, securing them tightly with screws.
- Measuring Tape: This tool ensures accuracy in measuring the dimensions of your bike rack, helping to maintain symmetry and proper spacing for the bikes.
- Level: A level is important for making sure the bike rack is even and stable, preventing any wobbling or tipping when in use.
- Pencil or Marker: A pencil or marker is used for marking cut lines or drill points on your materials, which aids in maintaining precision during the building process.
- Safety Gear: Safety goggles and gloves protect you during construction, ensuring you avoid injuries from tools and materials.
A drill is crucial for making holes in wood or metal for screws and anchors, ensuring a sturdy construction. It allows for efficient assembly and adjustment of your bike rack.
A saw, whether a hand saw or power saw, allows you to cut wood or metal pieces to the required lengths needed for your bike rack design. This tool is essential for customizing the dimensions based on your specific needs.
A screwdriver is necessary for assembling the various components of the bike rack, securing them tightly with screws. Depending on your design, you may need both flathead and Phillips screwdrivers.
This tool ensures accuracy in measuring the dimensions of your bike rack, helping to maintain symmetry and proper spacing for the bikes. Accurate measurements are vital for creating a functional and aesthetically pleasing rack.
A level is important for making sure the bike rack is even and stable, preventing any wobbling or tipping when in use. This tool ensures that the structure can support the weight of the bikes effectively.
A pencil or marker is used for marking cut lines or drill points on your materials, which aids in maintaining precision during the building process. Clear markings will guide your cuts and holes, making the assembly smoother.
Safety goggles and gloves protect you during construction, ensuring you avoid injuries from tools and materials. Using safety gear is essential to prevent accidents and promote a safe working environment.
What Are the Steps for Constructing a Simple DIY Bike Rack?
To construct a simple DIY bike rack, follow these essential steps:
- Gather Materials: Collect all necessary materials including wood, screws, and tools like a saw and drill.
- Design the Rack: Create a simple design that accommodates the number of bikes you intend to store, ensuring stability and accessibility.
- Cut the Wood: Measure and cut the wood pieces according to your design, making sure to wear safety equipment during this process.
- Assemble the Frame: Begin assembling the bike rack’s frame by attaching the vertical and horizontal pieces using screws for durability.
- Add Support and Stability: Include additional supports or cross-braces to ensure the rack is sturdy enough to hold the bikes securely.
- Finish and Protect: Sand any rough edges and apply a weather-resistant finish if the rack will be placed outdoors.
- Install the Rack: Securely position the bike rack in your desired location, ensuring it is stable and anchored if necessary.
- Test the Rack: Finally, test the bike rack with your bikes to ensure it meets your needs and adjust as necessary.
Gathering materials is the first step and includes items like treated lumber for durability, screws for assembly, and tools such as a saw, drill, and measuring tape to facilitate accurate construction.
Designing the rack involves sketching a layout that specifies where each bike will rest, ensuring that the design allows for easy access while optimizing space depending on how many bikes you wish to store.
Cutting the wood requires careful measurement to ensure all pieces fit together correctly; it’s essential to follow safety protocols while using power tools to prevent accidents.
Assembling the frame entails joining the cut pieces together, typically using screws to ensure a robust structure that can withstand the weight of the bikes.
Adding support and stability is crucial, as this will help prevent the rack from tipping over or becoming unstable when bikes are mounted; consider bracing the back of the rack or adding legs for extra support.
Finishing and protecting the wood is important, especially if the rack is to be placed outdoors, as this will help preserve the wood against weather elements and prolong its lifespan.
Installing the rack means determining the best location for it, whether in a garage, yard, or bike shed, ensuring it is firmly in place to prevent any movement.
Testing the rack with your bikes is the final step, allowing you to check for any adjustments needed in terms of spacing or stability before fully committing to the design.
How Can You Ensure Your Bike Rack is Safe and Durable?
To ensure your bike rack is safe and durable, consider the following factors:
- Quality Materials: Choose high-grade materials like steel or aluminum that can withstand weather conditions and the weight of multiple bikes.
- Sturdy Design: Opt for a design that provides stability and balance, reducing the risk of tipping or swaying while bikes are mounted.
- Proper Installation: Ensure that the rack is installed according to the manufacturer’s guidelines, using appropriate tools and securing it firmly to the ground or wall.
- Weight Capacity: Be aware of the weight capacity of your bike rack and avoid exceeding it to prevent bending or breaking.
- Regular Maintenance: Inspect your bike rack regularly for signs of wear, rust, or damage, and perform necessary repairs or replacements to maintain its integrity.
Quality Materials: Selecting high-quality materials is crucial for the longevity of your bike rack. Steel offers strength and durability, while aluminum is lightweight and resistant to corrosion, making it a great choice for outdoor use.
Sturdy Design: A well-designed bike rack should distribute weight evenly and provide a low center of gravity. This minimizes the risk of tipping, especially in windy conditions or when bikes are loaded, ensuring safety for both the bikes and the surrounding environment.
Proper Installation: Following installation guidelines is essential for safety and functionality. Properly anchoring the bike rack to the ground or a wall prevents it from shifting or falling, which could potentially cause injury or damage.
Weight Capacity: Each bike rack has a specified weight limit, and exceeding this capacity can lead to structural failure. It’s important to consider the number of bikes and their weight to ensure that the rack remains safe and functional.
Regular Maintenance: Regular checks can help identify issues before they become serious problems. Keeping your bike rack clean and rust-free, tightening bolts, and replacing any worn parts will extend its life and ensure it remains reliable for your biking needs.
Related Post: