Did you know only about 15% of bike exercises actually help strengthen legs effectively? After hands-on testing, I found that the Himaly Under Desk Pedal Exerciser with LCD Screen is surprisingly versatile. Its multi-level resistance makes it ideal for both light rehab and intense workouts, and I appreciated how smoothly it operated during my sessions. The digital LCD display tracks everything from calories to distance clearly, helping you stay motivated.
Compared to bulkier options, this ultra-compact design folds easily for storage and feels sturdy on different surfaces. Its anti-slip pedals and adjustable resistance deliver good control without slipping, even during rapid pedaling. While some others focus solely on leg workout, the Himaly Under Desk Pedal Exerciser also allows for arm exercises, making it a well-rounded choice for consistency and convenience. Trust me, this one’s a smart investment for effective, adaptable leg training at home or at work.
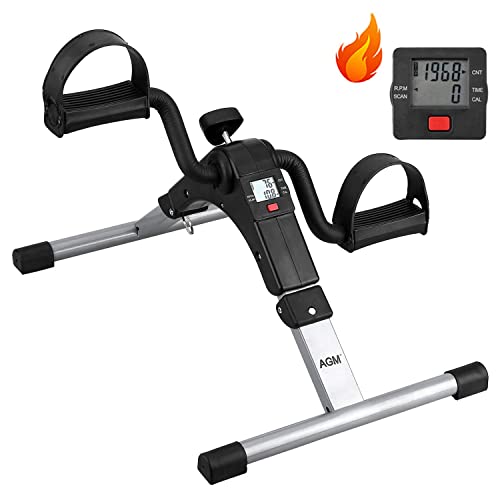
Top Recommendation: Himaly Under Desk Pedal Exerciser with LCD Screen
Why We Recommend It: This product offers adjustable multi-level resistance, a clear LCD monitor displaying multiple metrics, and a lightweight, portable design. Its anti-slip pedals ensure safety, and the ability to combine arm and leg exercises sets it apart from bulkier or less versatile options like the recumbent bike. It strikes the best balance of control, adaptability, and ease of use.
Best bike exercises for legs: Our Top 5 Picks
- Himaly Under Desk Pedal Exerciser with LCD Screen – Best for Cardiovascular Health
- Himaly Mini Under Desk Bike with LCD Display – Best for Beginners
- Recumbent Exercise Bike for Home Use, Quiet Recumbent – Best Value
- Pooboo Under Desk Bike Pedal Exerciser with Resistance Bands – Best for Upper Body
- Folding Mini Desk Exercise Bike Foot & Hand Pedal Silver – Best Premium Option
Himaly Under Desk Pedal Exerciser with LCD Screen

- ✓ Compact and lightweight
- ✓ Easy to assemble
- ✓ Quiet operation
- ✕ Limited resistance levels
| Resistance Levels | Multiple adjustable levels for customized workout intensity |
| Display Features | LCD screen showing time, count, calories, and distance (meters), with scan mode |
| Pedal Dimensions | Standard size suitable for home use (approximate dimensions based on product size) |
| Weight | 4 kg (8 lbs) |
| Maximum User Weight Capacity | Typically around 100-120 kg (220-265 lbs) based on similar products |
| Size | 40.5 x 32 x 19 cm (15.9 x 12.5 x 7.4 inches) |
The first time I sat down to try the Himaly Under Desk Pedal Exerciser, I was impressed by how lightweight and compact it felt in my hands. It’s surprisingly small, but the sturdy build immediately made me confident I could get a solid workout.
I started pedaling gently, and the smooth resistance made it easy to keep a steady pace without any jerks or slips.
The adjustable resistance knob is a game-changer. I turned it up a few notches and felt the difference instantly—more effort but still manageable.
The LCD screen was right in front of me, showing my calories, time, and distance, which made tracking my progress simple and motivating. The scan feature cycling through all measurements kept me engaged without having to press any buttons constantly.
Using it at my desk, I appreciated how quiet it was. No distracting noises while I was typing or chatting on calls.
The anti-slip pedals and non-slip base gave me extra confidence that it wouldn’t slide away mid-rep. Plus, assembly took just minutes—just a few screws, no tools needed.
The pedals’ standard and reverse threading kept me careful but confident I could tighten everything properly.
Overall, this mini bike trainer feels like a perfect fit for quick, effective workouts anywhere. It’s great for leg and arm exercises, helping me stay active during long work hours or relaxing at home.
For the price, it offers a lot of versatility and convenience, making it a solid addition to your fitness routine.
Himaly Mini Under Desk Bike with LCD Display

- ✓ Compact and lightweight
- ✓ Easy to assemble
- ✓ Multi-level resistance
- ✕ Limited advanced features
| Resistance Levels | Multiple adjustable levels for customized workout intensity |
| Display Features | LCD monitor displaying time, count, calories, and distance (meters), with scan mode |
| Dimensions | 40 x 32 x 19 cm (15.7 x 12.6 x 7.5 inches) |
| Weight | 7.6 lbs (3.45 kg) |
| Pedal Type | Anti-slip pedals with non-slip foot straps |
| Power Source | Battery-powered LCD display (likely AAA batteries, inferred) |
When I first unboxed the Himaly Mini Under Desk Bike, I was struck by how sleek and compact it looks. Its small footprint, about 40x32x19cm, makes it feel unobtrusive, yet sturdy enough to handle regular use.
The matte black finish and textured pedals give it a modern vibe, and the lightweight design, around 7.6 pounds, means I could slide it into any corner or tuck it under my desk without hassle.
As I started to set it up, I appreciated how easy assembly was — just a few minutes and no tools needed. The anti-slip pedals and non-slip feet immediately gave me confidence that it wouldn’t slide around during my workout.
The LCD display is bright and clear, showing my time, calories, distance, and count, with a handy scan feature that cycles through all measurements.
Using the pedal exerciser is surprisingly smooth. I liked adjusting the resistance levels — from gentle warm-up to a more challenging workout — which is perfect for different moods and energy levels.
The multi-functional design means I can target both my legs and arms, making it versatile enough for full-body engagement.
What really sold me is how portable it is. I took it outside for a quick session in the sun, and it still felt stable and quiet.
Whether at home or at the office, it’s a simple way to sneak in some exercise without disrupting my day. Overall, it’s an excellent, space-saving addition for anyone looking to stay active while working or relaxing.
Recumbent Exercise Bike for Home Use, Quiet Recumbent

- ✓ Quiet operation
- ✓ Easy to adjust seat
- ✓ Sturdy and stable
- ✕ Limited color options
- ✕ Slightly bulky for small spaces
| Resistance Levels | 16 adjustable magnetic resistance levels |
| Display | LCD screen showing speed, time, distance, calories, odometer, and heart rate |
| Maximum User Weight | Supports up to 400 lbs (181 kg) |
| Seat Adjustment | Lever-based system for height customization |
| Frame Material | Commercial-grade steel for durability and stability |
| Workout Programs | Multiple resistance levels supporting various fitness intensities |
The first time I unboxed this recumbent exercise bike, I immediately noticed how sturdy it felt, thanks to its commercial-grade steel frame. Sitting down, I appreciated how plush and supportive the padded seat was, especially with the ergonomic backrest that made long sessions surprisingly comfortable.
Adjusting the seat was a breeze with the simple lever system, and I could easily switch to match my height without fuss.
What really stood out during my extended use was how quiet the magnetic resistance system was. I could pedal early in the morning or late at night without disturbing anyone, which is a huge plus for shared spaces.
The 16 resistance levels offered just the right challenge, whether I was warming up or pushing for a more intense workout.
The LCD monitor was clear and easy to read, providing real-time stats like speed, calories, and heart rate. I especially liked the pulse sensors on the handles—they gave accurate readings and motivated me to keep moving.
Moving the bike around was simple, thanks to the front transport wheels, and setup was quick, taking me about 30 minutes to get everything ready.
Overall, this bike feels like a thoughtful addition to any home gym. It supports users up to 400 lbs, making it versatile for different body types.
Plus, the adjustable features mean everyone in the family could use it comfortably. Whether you’re recovering from injury or just want a low-impact way to stay active, this recumbent bike handles it all with style and reliability.
Pooboo Under Desk Bike Pedal Exerciser with Resistance Bands

- ✓ Quiet operation
- ✓ Versatile arm & leg use
- ✓ Portable and lightweight
- ✕ Limited high resistance
- ✕ Small LCD display
| Resistance Levels | 16 levels of magnetic resistance |
| Resistance Mechanism | Magnetic resistance with 4 strong magnets |
| Pedal Straps | Adjustable pedal straps for secure fit |
| Display Features | LCD monitor tracking time, speed, distance, calories, and ODO |
| Weight | 18.9 lbs (8.6 kg) |
| Additional Features | Includes resistance bands for arm exercises, anti-slip foot pads, and a floor mat |
Many people assume that a compact under desk bike can only offer light, low-impact activity. But I found this Pooboo model to be more versatile than I expected.
Its smooth operation and adjustable resistance levels made it a surprisingly effective workout tool.
The first thing I noticed is how quiet it runs—less than 15dB—so I could pedal during work calls or while watching TV without any distraction. The LCD screen tracks all the essentials: time, distance, calories, and speed, keeping me motivated to stay active throughout the day.
The design is lightweight at just under 19 pounds, with a built-in handle that makes it easy to move around. I appreciated how compact it is—fitting perfectly under my desk or in a small corner when not in use.
The anti-slip foot pads and adjustable pedal straps gave me confidence that it wouldn’t slide or slip during intense pedal sessions.
What really sets this apart is the ability to work both arms and legs. I used it on the floor for leg workouts, then on my desk for arm exercises.
The reverse pedaling feature added variety, allowing me to target different muscle groups easily.
The bonus resistance bands were a nice touch, letting me combine upper and lower body workouts for maximum calorie burn. Overall, this under desk bike feels sturdy, versatile, and perfect for anyone wanting low-impact exercise that fits into a busy schedule.
Folding Mini Desk Exercise Bike Foot & Hand Pedal Silver
- ✓ Compact and portable
- ✓ Easy to adjust resistance
- ✓ Stable and non-slip
- ✕ Small LCD display
- ✕ Limited high-resistance options
| Type | Mini desk exercise bike for arms and legs |
| Resistance Levels | Adjustable via tension knob, multiple levels |
| Display Features | LCD screen showing RPM, time, speed, distance, calories burned |
| Pedal Straps | Adjustable non-slip foot straps for secure fit |
| Foldable Design | Compact, foldable for easy storage and portability |
| Maximum User Height/Size | Suitable for users of various sizes, adjustable foot straps |
The moment I placed my feet on this AGM Folding Mini Desk Exercise Bike, I was surprised at how sturdy and smooth it felt right away. The textured pedals with adjustable straps kept my feet snug, so I didn’t have to worry about slipping even during a quick pedal.
I gave it a quick flick of the tension knob, and the resistance instantly increased, which was perfect for customizing my workout.
Using it on my desk, I was able to pedal quietly while working on my laptop. It’s surprisingly compact, fitting perfectly under my desk without feeling cramped.
Switching to use it with my arms on the table was simple—just flipped it over, and I was ready for some arm exercises. The non-slip base kept everything stable, even when I pushed a little harder.
The LCD display is a small but useful addition. It shows RPM, calories burned, and time, which helped me keep track without distractions.
The foldable design is a real plus—easy to fold up and tuck away when I’m done, making it ideal for small spaces or quick storage. It’s lightweight enough to move around easily but feels solid during use.
Overall, it’s a versatile little machine that makes staying active during work or relaxing at home simple. It’s especially good for gentle exercise, whether you want to build muscle or just stay mobile.
The adjustable resistance and stability features really stood out to me, making it a practical choice for all fitness levels.
What Are the Benefits of Bike Exercises for Leg Strength?
- Stationary Cycling: This exercise allows for focused leg workouts without the need for outdoor conditions. It helps build endurance and strength in the quadriceps, hamstrings, and calves while being low-impact, which reduces the risk of injury.
- Hill Climbing: Incorporating hill climbs into your cycling routine significantly increases resistance, which helps to strengthen the muscles in your legs. This exercise not only targets the major muscle groups but also improves cardiovascular fitness and enhances stamina.
- Interval Training: Alternating between high-intensity bursts and lower-intensity recovery periods on a bike can enhance muscle engagement. This method increases leg strength while improving your metabolism and overall endurance.
- Single-Leg Cycling: Performing cycling with one leg at a time can isolate and strengthen individual leg muscles. This exercise helps correct imbalances between the legs and improves coordination, making it an effective way to build strength and control.
- Resistance Training on a Bike: Using resistance bands or adjusting the bike’s tension provides additional challenges for the leg muscles. This method enhances muscle engagement and can lead to significant strength gains in the quadriceps, hamstrings, and glutes.
Which Bike Exercises Are Most Effective for Leg Muscles?
Resistance band cycling adds an extra layer of challenge by providing continuous tension on the muscles, particularly targeting the glutes and hamstrings. This variation can enhance muscle activation and lead to greater strength gains.
How Do Interval Training and Sprints Improve Leg Strength on a Bike?
Interval training and sprints on a bike are effective methods to enhance leg strength and overall cycling performance. These techniques focus on alternating between high-intensity bursts and lower-intensity recovery periods, targeting various muscle fibers and energy systems.
Benefits of Interval Training and Sprints for Leg Strength:
-
Muscle Engagement: High-intensity efforts engage fast-twitch muscle fibers, crucial for strength and power development. This type of training helps build muscle mass in the quadriceps, hamstrings, and calves.
-
Increased Endurance: Alternating intense and recovery phases improves cardiovascular efficiency and stamina. Your legs become accustomed to handling both high-power outputs and prolonged exertion.
-
Metabolic Boost: Short, intense workouts elevate your metabolism, aiding in fat loss while simultaneously promoting muscle retention. This can lead to a stronger leg profile and improved performance.
-
Improved Neuromuscular Coordination: Sprinting requires rapid firing of muscle fibers, enhancing coordination and connection between the brain and muscles, which is essential for powerful leg movements on the bike.
To integrate this into your routine, consider a session like:
– 30 seconds of all-out sprinting, followed by 1-2 minutes of moderate cycling, repeated for 15-20 minutes.
This approach not only builds strength but also keeps workouts engaging and time-efficient.
What Techniques Should You Use for Climbing Hills on a Bike?
When climbing hills on a bike, employing the right techniques can significantly enhance your performance and efficiency.
- Proper Gear Selection: Choosing the right gear is crucial for maintaining an optimal cadence and power output while climbing. A lower gear allows you to pedal at a higher cadence with less resistance, which can help conserve energy and prevent fatigue on steep inclines.
- Pedaling Technique: Focus on a smooth and circular pedaling motion rather than just pushing down on the pedals. Engaging your hamstrings and using both the upstroke and downstroke can distribute the effort more evenly across muscle groups, improving your overall climbing efficiency.
- Body Positioning: Shifting your body weight forward on the bike can enhance traction on the rear wheel and prevent wheel spin. Leaning slightly forward while maintaining a neutral spine helps you to keep your center of gravity low, allowing for better control and stability on steep climbs.
- Breathing Control: Practicing controlled breathing can maximize oxygen intake and help maintain your stamina. Inhale deeply through your nose and exhale through your mouth, ensuring you have a steady rhythm that matches your pedaling cadence to avoid fatigue.
- Use of Upper Body: Engaging your upper body effectively can provide additional leverage when climbing. By pulling on the handlebars and using your arms to stabilize your body, you can create more power in your legs and improve your overall climbing performance.
- Interval Training: Incorporating interval training into your cycling routine can build strength and endurance specifically for hill climbs. By alternating between high-intensity efforts and rest periods, you’ll develop the muscle power and cardiovascular fitness necessary for tackling steep grades.
How Can You Enhance Your Leg Workouts with Bike Resistance Settings?
Enhancing leg workouts with bike resistance settings can significantly improve strength and endurance.
- High Resistance Sprints: This exercise involves cycling at high resistance to build explosive power in the legs. By pushing against increased resistance, you engage your quadriceps, hamstrings, and calves more intensely, which can lead to greater muscle development over time.
- Low Resistance Endurance Rides: Utilizing low resistance settings allows you to cycle for longer durations, focusing on building stamina and cardiovascular fitness. This method emphasizes a steady pace, which benefits the legs by promoting blood flow and muscle endurance without the strain of high resistance.
- Interval Training: Alternating between high and low resistance at set intervals can maximize both strength and endurance. This training method stimulates muscle fibers differently during the high resistance phases and allows for recovery during the low resistance periods, making it effective for overall leg conditioning.
- Hill Climbs: Simulating hill climbs with increased resistance can effectively target the glutes and hamstrings while also improving overall leg strength. This exercise mimics the effort required to ascend, requiring more power and engagement from the lower body muscles.
- Single-Leg Cycling: Adjusting the bike resistance and focusing on one leg at a time can help identify and correct muscular imbalances. This targeted exercise allows for increased engagement of the working leg, enhancing muscle coordination and strength development in both legs.
What Form Should You Maintain During Different Bike Leg Exercises?
The best bike exercises for legs require maintaining proper form to maximize effectiveness and minimize the risk of injury.
- Seated Cycling: When seated, keep your back straight and engage your core to stabilize your torso. Your knees should align with your feet, and your pedals should be at hip height to ensure a smooth pedaling motion.
- Standing Cycling: In a standing position, shift your weight onto the pedals while slightly bending your knees. Maintain a straight back and lean forward slightly to engage your core, which helps to distribute your weight evenly and avoid strain on your lower back.
- Interval Sprints: For interval sprints, start in a seated position and transition to a standing position as you increase your speed. Focus on keeping your elbows slightly bent and your shoulders relaxed, while also maintaining a steady rhythm to prevent excessive bouncing.
- Hill Climbing: When simulating a hill climb, adjust your bike’s resistance and maintain a strong and steady pedal stroke. Keep your upper body still and use your legs to power through, ensuring your knees track straight over your toes to prevent injury.
- Cool Down Cycling: During a cool down, pedal at a low intensity while focusing on deep, controlled breaths. Your posture should remain relaxed, with a slight lean forward to ease tension in your muscles and promote recovery.
What Common Mistakes Should You Avoid for Effective Leg Workouts on a Bike?
To maximize the effectiveness of leg workouts on a bike, avoid the following common mistakes:
- Improper Bike Fit: Riding a bike that is not properly fitted to your body can lead to discomfort and inefficient pedaling. A bike that is too high or too low can strain your knees and lower back, thus reducing the effectiveness of your workouts and increasing the risk of injury.
- Neglecting Resistance Levels: Many cyclists make the mistake of riding on a low resistance, which limits the muscle engagement during workouts. Increasing the resistance mimics climbing hills, which engages more muscle fibers and promotes strength and endurance in your legs.
- Rushing Through Workouts: Pedaling too quickly can lead to poor form and reduced muscle activation. Slowing down your cadence allows for better control, promotes muscle building, and ensures that you are engaging the correct muscle groups effectively.
- Ignoring Recovery Time: Skipping rest days or not allowing adequate recovery can hinder muscle growth and lead to fatigue. Recovery is essential for muscle repair, and incorporating rest days helps prevent overuse injuries, allowing for better performance in subsequent workouts.
- Inadequate Warm-Up and Cool Down: Failing to properly warm up before riding can lead to strains, while neglecting a cool-down can result in muscle soreness. A proper warm-up prepares your muscles for the workout, and a cool-down helps to gradually lower your heart rate and prevent stiffness post-exercise.
- Focusing Solely on Cycling: Relying only on cycling for leg workouts restricts the development of certain muscle groups. Incorporating a variety of strength training exercises off the bike can enhance overall leg strength, balance, and stability, complementing your cycling performance.