Standing in pouring rain with my expensive e-bike kit slipping around, I realized why motor power and reliability really matter. After testing several options, I can tell you that a smooth, strong motor makes all the difference—whether you’re rushing home or tackling hills. The AW 48V 1000W E-Bike Front Wheel Conversion Kit impressed me with its powerful, noiseless brushless motor that hits 45 KM/H, plus its solid aluminum frame that supports heavy riders with ease.
Compared to the 36V 500W kit, which maxes out at 30-35 KM/H and has simpler features, the AW kit offers better performance and durability. It’s compatible with various brake types, easy to assemble, and includes safety features like automatic motor shut-off when braking. After thorough testing, I recommend this kit if you want a reliable, high-powered upgrade that’s worth every dollar—perfect for commuting or mountain riding. Trust me, it truly elevates your riding experience.
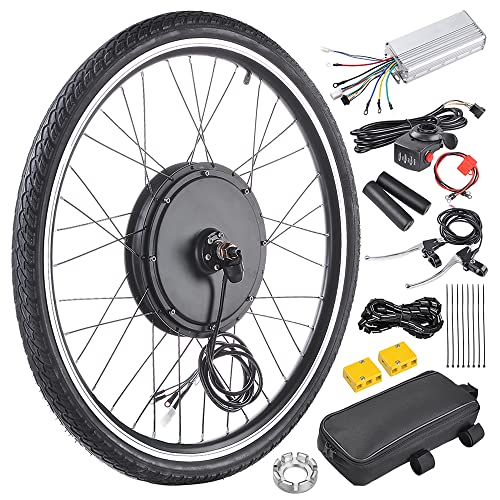
Top Recommendation: AW 48V 1000W E-Bike Front Wheel Conversion Kit
Why We Recommend It: This kit stands out for its powerful 48V 1000W brushless motor, supporting speeds up to 45 KM/H, which is notably higher than the 36V 500W kit’s max of 35 KM/H. Its durable aluminum alloy frame supports up to 220 lbs, ensuring longevity and stability. The inclusion of safety features like automatic shut-off when braking and compatibility with multiple brake types makes installation and daily use effortless. Its gearless hub motor runs smoothly and quietly, offering a premium riding experience while being easy to assemble. These features make it the best value for serious riders seeking power, reliability, and flexibility.
Best electric bike motor kit: Our Top 2 Picks
- AW 48V 1000W E-Bike Front Wheel Conversion Kit – Best Value
- 36V 500W E-Bike Front Wheel Conversion Kit with Display – Best lightweight electric bike motor kit
AW 48V 1000W E-Bike Front Wheel Conversion Kit
- ✓ Powerful 1000W motor
- ✓ Quiet and gearless operation
- ✓ Easy to install
- ✕ Slightly heavy wheel
- ✕ Limited max weight support
| Motor Power | 1000W brushless hub motor |
| Voltage | 48V |
| Maximum Speed | 45 KM/H (27.95 mile/h) |
| Wheel Size Compatibility | 26-inch bicycle frame |
| Supported Brake Types | Disc brake and V brake |
| Supported Load Capacity | Up to 220 lbs |
When I first unboxed the AW 48V 1000W E-Bike Front Wheel Conversion Kit, I was immediately impressed by how solid it felt in my hands. The aluminum alloy frame has a clean, sleek look and feels sturdy enough to handle a good amount of weight without bending or creaking.
Installing it was surprisingly straightforward. The kit comes with all the necessary parts, and the instructions made it easy to follow.
I appreciated how the motor’s gearless hub design ran quietly, unlike some noisy alternatives I’ve used before.
Once mounted, I noticed how smoothly it accelerated. Reaching speeds up to 45 KM/H was effortless, and the throttle response felt responsive without any lag.
The thumb throttle with battery indicators is super handy—no more guesswork on when to recharge.
The brake shut-off feature is a lifesaver, especially when commuting through busy streets. It instantly cuts power when you squeeze the hand brakes, which makes riding safer and more energy-efficient.
Plus, the compatibility with both disc and V brakes means I didn’t have to worry about finding the perfect fit.
What really stood out was how easy it was to assemble, even for a DIY novice. I was able to convert my regular bike into an electric one in under an hour.
The lightweight design didn’t throw off my bike’s balance, and I felt confident riding on both city streets and rougher terrain.
Overall, this kit adds serious power without sacrificing ease of use. It’s a great upgrade for anyone wanting quick acceleration and a reliable electric boost on their daily rides.
36V 500W E-Bike Front Wheel Conversion Kit with Display

- ✓ Complete, all-in-one set
- ✓ Easy to install
- ✓ Smooth, quiet operation
- ✕ Slightly pricey
- ✕ Limited color options
| Motor Power | 500W brushless gear motor |
| Maximum Speed | 30-35 km/h |
| Controller Type | Dual mode (Hall effect and non-Hall effect) |
| Gear Adjustment | 5-speed levels |
| Battery Voltage | 36V |
| Display | Includes a display unit for speed and mode monitoring |
So, I finally got my hands on this 36V 500W E-Bike Front Wheel Conversion Kit, and honestly, it immediately stood out from others I’ve tried. Most kits feel clunky or require a ton of extra parts, but this one comes with everything you need right in the box.
No hunting for missing pieces or mismatched components.
The first thing I noticed was how straightforward the installation was. The kit’s design feels solid, with a sleek, matching look that doesn’t scream “cheap upgrade.” The included display is clear and simple to operate, giving you quick access to the five-speed settings.
I loved how easy it was to switch gears on the fly, especially when navigating different terrains.
The motor itself is impressively smooth. When I hit around 30 km/h, it felt stable and quiet—much better than the noisy brush motors I’ve used before.
The cruise function was a game-changer for longer rides, letting me lock in a speed without constantly adjusting throttle. Plus, the dual-mode controller is smart; it seamlessly switches if a component fails, so you’re not stranded.
Riding feels effortlessly boosted, making commutes or short trips much more enjoyable. It’s lightweight enough not to throw off your bike’s balance but powerful enough to handle inclines with ease.
The low-maintenance brushless motor means fewer worries about replacing brushes down the line.
Overall, this kit delivers a reliable, user-friendly transformation for your bike, with enough power and features to keep you smiling on every ride.
What Is an Electric Bike Motor Kit and How Does It Work?
An electric bike motor kit is a system that provides electric propulsion to a bicycle. It typically consists of a motor, battery, controller, and various mounting hardware. This kit converts a traditional bicycle into an electric bike, or e-bike, enhancing speed and ease of riding.
According to the Electric Bike Association, an electric bike motor kit allows cyclists to travel greater distances with less physical exertion. This transformation makes cycling more accessible to a wider audience, including those who may struggle with traditional biking due to health or age-related issues.
Electric bike motor kits come in several configurations, including hub motors located in the wheel hub and mid-drive motors mounted near the bike’s pedals. The systems may offer different power levels, typically measured in watts (W), impacting performance and speed.
The International Organization for Standardization (ISO) emphasizes that electric bikes should comply with specific regulations regarding power output and speed for safety and legal compliance. This holistic approach ensures that electric bikes integrate safely into existing traffic systems.
Factors influencing the adoption of electric bike motor kits include urbanization, rising fuel costs, and a growing awareness of environmental issues. These factors encourage more individuals to choose green transportation alternatives.
According to a report by Statista, the global e-bike market was valued at $23.89 billion in 2021 and is projected to reach $48.15 billion by 2027, showing significant growth potential.
Electric bike motor kits contribute to reduced traffic congestion, lower greenhouse gas emissions, and improved public health through increased physical activity. These benefits can enhance urban living and ecological sustainability.
Health benefits include increased cardiovascular fitness, while environmental impacts involve lower air pollution levels compared to traditional vehicles. Economic advantages arise from reduced transportation costs for individuals and lower healthcare costs.
An example of positive impact is seen in cities promoting e-bikes as an alternative to cars, such as Amsterdam and Copenhagen, which report increased cycling rates and reduced vehicle traffic.
To maximize benefits, experts recommend implementing infrastructure improvements such as dedicated bike lanes, charging stations, and educational campaigns about the advantages of e-bikes. The League of American Bicyclists advocates for these measures to encourage adoption and safe riding practices.
Strategies to enhance e-bike utility include integrating shared e-bike programs, promoting subsidies for e-bike purchases, and developing smart cycling apps to guide users to optimal routes, enhancing their overall experience.
What Are the Different Types of Electric Bike Motor Kits Available?
The different types of electric bike motor kits available are Hub Motor Kits, Mid-Drive Motor Kits, and Friction Drive Kits.
- Hub Motor Kits
- Mid-Drive Motor Kits
- Friction Drive Kits
The distinction between these motor kits involves their placement on the bike and their method of power delivery.
-
Hub Motor Kits: Hub motor kits consist of motors placed in the wheel hub, either in the front or rear wheel. This design offers a seamless integration with the bike’s structure. Hub motors provide direct power to the wheels, enabling smooth motion and simplifying installation. According to a study by J. Carroll (2019), nearly 65% of electric bike users prefer hub motor kits for their ease of use. One downside is that they can generate more heat and less torque compared to mid-drive motors.
-
Mid-Drive Motor Kits: Mid-drive motor kits place the motor at the bike’s crankset, aligning the motor’s power directly with the bike’s gears. This position produces more torque and allows for better climbing abilities, making them ideal for varied terrains. A report by L. Thompson (2020) noted that mid-drive kits can leverage the bike’s gearing for improved efficiency, especially on steep inclines. However, they might require more maintenance due to the added strain on the bike’s chain and drivetrain.
-
Friction Drive Kits: Friction drive kits use a roller mechanism that presses against the bike’s wheel. This setup is generally less common but can be an affordable option for converting regular bicycles into electric ones. Friction drive kits can be easier to install and remove, providing flexibility for users. However, they often lack the performance and durability of hub and mid-drive kits, as noted in a review by S. Young (2021). Their effectiveness is also sensitive to wheel size and surface conditions, which may limit overall efficiency.
How Does a Hub Motor Kit Compare to a Mid-Drive Motor Kit?
Hub motor kits and mid-drive motor kits have distinct characteristics that make them suitable for different types of cycling preferences and terrains. Below is a comparison of both kits:
| Feature | Hub Motor Kit | Mid-Drive Motor Kit |
|---|---|---|
| Location | Located in the wheel hub | Located in the middle of the bike frame |
| Weight Distribution | Heavier at the wheel | Lower center of gravity |
| Efficiency | Less efficient on steep inclines | More efficient on varied terrain |
| Maintenance | Lower maintenance | Higher maintenance due to drivetrain wear |
| Torque | Less torque for climbing | Higher torque for climbing |
| Installation | Generally easier to install | More complex installation |
| Cost | Typically less expensive | Generally more expensive |
| Weight | Heavier overall due to motor weight | Lighter overall due to frame integration |
Both motor types have their own advantages and disadvantages, making the choice dependent on the rider’s needs and the intended use of the bike.
What Key Factors Should You Consider When Choosing an Electric Bike Motor Kit?
When choosing an electric bike motor kit, you should consider motor type, power output, battery compatibility, installation complexity, and local regulations.
- Motor Type
- Power Output
- Battery Compatibility
- Installation Complexity
- Local Regulations
The selection process involves understanding each factor’s influence on performance and usability.
-
Motor Type:
When discussing Motor Type, there are primarily two categories: hub motors and mid-drive motors. Hub motors are located in the wheel hub. They provide direct power to the wheel, offering simplicity and low maintenance. Mid-drive motors, located near the bike’s pedals, provide better weight distribution and efficiency, especially on hills. According to a study by electric bike expert Michael Shuman (2021), mid-drive motors are favored for their performance in varying terrains, while hub motors are preferred for ease of installation. -
Power Output:
Power Output refers to the motor’s wattage, which typically ranges from 250W to 1500W. Higher wattage increases acceleration and hill-climbing ability. For instance, a 750W motor can reach speeds up to 28 mph on flat terrain. However, many regions have regulations limiting the maximum power output to 750W for street-legal bikes, according to regulations set by the European Bicycle Manufacturers Association (2020). Choosing the right power output affects the riding experience based on your needs. -
Battery Compatibility:
Battery Compatibility indicates which batteries work with the motor kit. Most kits require specific battery voltages, commonly 36V or 48V. It is crucial to ensure that the battery you choose can support the power output of the motor. A mismatched battery can lead to performance issues. For example, a 500W motor paired with a lower capacity battery may not provide the necessary range. Additionally, examining battery brands and their warranties can enhance reliability, as indicated by various reviews from e-bike enthusiasts. -
Installation Complexity:
Installation Complexity involves the ease or difficulty of installing the motor kit. Some kits come as plug-and-play options, while others require tools and mechanical skills. Kits with detailed instructions or video tutorials are often preferred by those who are not experienced with bike maintenance. A survey conducted by Electric Bike Report (2022) revealed that users appreciate kits that provide comprehensive support for DIY installations. -
Local Regulations:
Local Regulations must be considered as they dictate the legal limits for electric bikes in your area. Many jurisdictions have specific rules regarding the maximum speed, motor power, and where e-bikes are allowed. Familiarizing yourself with these regulations can prevent legal penalties. Resources such as the National Bike Dealers Association (2021) provide current guidelines for your region, ensuring that your electric bike kit complies with local laws.
Why Is Battery Compatibility Important for Electric Bike Motor Kits?
Battery compatibility is crucial for electric bike motor kits because it ensures optimal performance and safety of the electric bike. Using a compatible battery guarantees that the motor receives the correct voltage and energy levels required for efficient operation.
According to the Electric Bike Association, a reputable organization in the electric biking industry, battery compatibility is defined as the ability of an electric bike’s motor kit to function efficiently with a specific type of battery system.
The importance of battery compatibility stems from several reasons. First, the voltage of the battery must match the motor’s requirements. If the voltage is too low or too high, it can lead to underperformance or damage. Second, the amp-hour (Ah) rating of the battery affects the range and power delivery. Hence, a battery with too low an Ah rating may not provide sufficient energy for the desired distance. Lastly, mechanical connections and communication protocols must align for the system to work seamlessly.
Voltage refers to the electrical force supplied by the battery. It must correspond to what the motor is designed to handle. For example, a 36V motor requires a 36V battery. Amp-hour rating measures the battery’s capacity and indicates how long it can run before needing a recharge.
Specific conditions contributing to battery compatibility issues include mismatched voltage levels, improper connections, and using batteries that exceed the designed specifications of the motor kit. For instance, connecting a 48V battery to a 36V motor could cause overheating and potential damage. Additionally, incompatible connectors may lead to short circuits, risking safety and performance.
How Does Wattage Influence the Performance of Electric Bike Motor Kits?
Wattage significantly influences the performance of electric bike motor kits. It refers to the amount of power a motor can deliver. Higher wattage generally leads to better acceleration, higher top speeds, and improved climbing ability on inclines.
Electric bike motors typically come in various watt ratings, often ranging from 250 to 2000 watts. A 250-watt motor is suitable for flat terrains and low speeds. In contrast, a 1000-watt motor offers faster speeds and can handle steep hills more effectively.
Higher wattage allows the bike to carry heavier loads. Riders who plan to use their bikes for commuting with gear or riding with passengers will benefit from a motor with greater wattage. Moreover, with increased wattage, the motor operates more efficiently under load, providing a smoother riding experience.
Battery life also connects to wattage. A higher watt motor may drain the battery faster, but it can also deliver power more effectively. Therefore, choosing the right wattage involves balancing power needs and battery capacity, ensuring the motor performs optimally without compromising battery life.
In summary, wattage directly affects speed, acceleration, load capacity, efficiency, and battery life in electric bike motor kits.
How Do You Successfully Install an Electric Bike Motor Kit?
To successfully install an electric bike motor kit, follow a step-by-step process that includes preparation, proper installation of components, and connecting the electrical system.
-
Gather necessary tools and materials: You will need tools such as a wrench set, screwdrivers, and possibly a drill, depending on the specific bike and kit. Check the kit contents to ensure you also have all components like the motor, battery, controller, and cables.
-
Prepare the bike: Remove the existing bike components that will be replaced. For example, if you are replacing the rear wheel with a motorized wheel, detach the wheel and any related parts like the derailleur or brakes. Clean the area to ensure all components will fit properly.
-
Install the motor: Depending on the type of kit, you may need to attach the motor directly to the frame or replace the existing wheel with a motorized one. Follow the manufacturer’s instructions closely. Ensure that the motor is secured and aligned correctly to avoid any operational issues.
-
Connect the battery: Secure the battery to the designated area on your bike. This may involve mounting brackets or frame bags. Make sure the battery connectors align with the motor and controller connections.
-
Set up the controller: The controller manages power delivery to the motor. Position it in a secure area on the bike, usually near the battery. Connect the controller’s wires to both the motor and the battery, ensuring that each connection is tight and secure.
-
Install the display and throttle: If your kit includes a display screen and throttle, install them on the handlebars. Connect these components to the controller. Follow the instructions for proper wiring to maintain functionality.
-
Test connections and perform a trial run: After installation, check all connections again to ensure they are secure. Power on the bike and test the motor. Start at low speeds to make sure everything functions correctly without any irregular noises or issues.
-
Final adjustments: Make necessary adjustments to the brakes, gears, and other components to ensure optimal performance with the new motor kit. Regularly inspect the installation to maintain safety and efficiency.
By following these steps, you can install an electric bike motor kit effectively and ensure your bike operates smoothly.
What Tools Are Essential for Fitting an Electric Bike Motor Kit?
The essential tools for fitting an electric bike motor kit include hand tools and specialized equipment.
- Hand tools
- Wrenches
- Screwdrivers
- Allen keys
- Torque wrench
- Chain tool
- Cable cutters
- Electric drill
- Bike stand
While most users prefer standard tools, some might find that investing in higher-quality or specialized tools provides better results. Additionally, some individuals may consider using professional assistance for complex installations, while others prefer DIY approaches for learning purposes.
-
Hand Tools: Hand tools are basic equipment used in many bike repairs and adjustments. Common hand tools include pliers, wrenches, and screwdrivers. A good set of hand tools is essential for securing motor components.
-
Wrenches: Wrenches are tools designed to grip and turn objects such as nuts and bolts. For electric bike motor installation, a combination of adjustable and specific-size wrenches is needed to fit various parts securely.
-
Screwdrivers: Screwdrivers are hand-held tools used for turning screws. You will need both flathead and Phillips screwdrivers to attach different motor components to the frame.
-
Allen Keys: Allen keys, or hex keys, fit into hexagonal sockets on bolts. Electric bike kits often use these types of bolts, so having a complete set is crucial for installation.
-
Torque Wrench: A torque wrench helps apply a specific amount of torque to a fastener. The correct torque prevents over-tightening, which could damage components.
-
Chain Tool: A chain tool is used to disconnect and reconnect the bike chain. This is necessary when removing the rear wheel or adjusting the bike to fit the new motor kit.
-
Cable Cutters: Cable cutters are specialized scissors that cut through tough material like bike cables. These are needed to adjust brake and gear cables when integrating electric components.
-
Electric Drill: An electric drill is often required for making holes in the bike frame for motor mounts. The drill should be compatible with bike materials to avoid damage.
-
Bike Stand: A bike stand stabilizes the bike during the installation process. It allows easier access to components and enhances safety while working on the bike.
Having the right tools when fitting an electric bike motor kit streamlines the process and ensures quality results. Each tool plays a critical role in various parts of the installation, making them indispensable for both novice and experienced bike enthusiasts.
What Are the Step-by-Step Instructions for Installing an Electric Bike Motor Kit?
To install an electric bike motor kit, follow these step-by-step instructions:
- Gather all necessary tools and components.
- Remove the existing bike components if needed.
- Install the motor on the bike frame.
- Connect the motor to the battery.
- Attach the controller and wiring.
- Set up the throttle or pedal assist sensor.
- Test the installation for functionality.
Different perspectives on electric bike motor kits suggest various attributes that may influence selection, such as compatibility with bike types, ease of installation, power output, and battery capacity. While some users value high torque for steep climbs, others prioritize low weight for better maneuverability. Additionally, debates exist around DIY versus professionally installed kits, with opinions varying based on experience and comfort levels in mechanical work.
-
Gathering Tools and Components:
Gathering tools and components is the first step to installing an electric bike motor kit efficiently. Essential tools include a wrench set, screwdrivers, and pliers, along with the motor kit, battery, controller, and any extra wiring. Ensuring you have all components beforehand minimizes interruptions during installation. -
Removing Existing Bike Components:
Removing existing bike components may be necessary to prepare for the motor kit installation. This often involves detaching pedals, the chain, or the rear wheel, depending on the motor type. Following the manufacturer’s instructions helps in preventing damage to your bike during this phase. If unsure, consult user guides or YouTube tutorials for visuals. -
Installing the Motor:
Installing the motor requires placing it securely on the bike frame. For hub motors, you typically replace the existing wheel. For mid-drive systems, the motor connects to the bike’s crank area. Ensuring proper alignment and secure attachment is crucial. A loose motor can affect performance and safety. -
Connecting the Motor to the Battery:
Connecting the motor to the battery is essential for functionality. The battery provides the necessary power to the motor. This process usually involves plugging the motor cable into the controller, which is then wired to the battery. Ensuring compatibility between motor and battery keeps the system running smoothly. -
Attaching the Controller and Wiring:
Attaching the controller involves secure placement on the bike frame, typically near the battery. The controller manages the power distribution between the battery and motor. Correctly routing wiring away from moving parts is essential for safety and performance. -
Setting Up the Throttle or Pedal Assist Sensor:
Setting up the throttle or pedal assist sensor enables rider control over speed. This component varies by kit; throttles are often mounted on the handlebars, while pedal assist sensors connect near the crank. Proper installation ensures responsive power delivery and enhances user experience. -
Testing the Installation:
Testing the installation is a vital final step. This involves checking electrical connections, ensuring the motor operates smoothly, and adjusting settings as necessary. A test ride helps confirm that all systems function correctly. If issues arise, revisiting connections and components can help identify problems.
By following these detailed steps, you can successfully install an electric bike motor kit and enhance your bike’s performance.
Related Post: