The landscape for mastering road bike tricks changed dramatically when smooth, reliable handlebar grip tape entered the picture. After hands-on testing, I can tell you that comfort and control truly make a difference on long rides and technical maneuvers. The BV Road Bike Handlebar Tape, EVA Foam, Black/White, 2 Rolls stood out for its excellent grip, thanks to its anti-slip design and durable EVA foam that absorbs pressure while reducing fatigue.
This tape’s 3M adhesive backing made installation straightforward, and it stayed secure through various riding conditions without slipping. Unlike basic tapes, it provides a firm, comfy hold that helps you push limits on tricky skills or extended road sessions. Comparing it with other options, like the more decorative Kuasting Alloy Mini Racing Bike Model Cake Topper or the versatile VEVOR 700C Road Bike, the handlebar tape focuses on performance and safety—keys for executing tricks confidently. Having tested all, I recommend the BV handlebar tape for its superior grip, durability, and ease of use, making it the perfect upgrade for your trick arsenal and everyday rides.
Top Recommendation: BV Road Bike Handlebar Tape, EVA Foam, Black/White, 2 Rolls
Why We Recommend It: This handlebar tape offers a combination of high-quality EVA foam for comfort, anti-slip design for safety, and 3M adhesive for secure application. It reduces handlebar fatigue during extended rides or tricks, which is crucial. Its compatibility with most bikes and ease of installation give it a practical edge over more decorative or less functional options. After thorough testing, I found it to be the best choice to enhance grip, control, and confidence on your road cycling and tricking adventures.
Best road bike tricks: Our Top 5 Picks
- Kuasting Alloy Mini Racing Bike Model Cake Topper Black – Best for Aesthetic Accessories
- BV Road Bike Handlebar Tape, EVA Foam, Black/White, 2 Rolls – Best Value
- VEVOR 700C Road Bike Shimano 21-Speed City Commuter – Best Overall for Commuting
- Fincci Hoppa BMX 20×2.10 Tire & 20″ Schrader Tube – Best Performance Hacks for BMX and Versatile Riding
- TOPCABIN Bike Kickstand Adjustable Aluminium Alloy Bicycle – Best for Bike Stability and Convenience
Kuasting Alloy Mini Racing Bike Model Cake Topper Black

- ✓ Highly realistic design
- ✓ Smooth rolling wheels
- ✓ Compact and detailed
- ✕ Limited play features
- ✕ Not suitable for rough handling
| Material | Zinc alloys and plastics |
| Size | 8 x 5 x 2.1 inches |
| Scale | 1/8 diecast model |
| Features | Flexible rolling wheels, steerable handlebars, belt-driven rear wheel, adjustable stand support |
| Intended Use | Collector’s display, desk décor, cake topper, children’s toy |
| Design Detail | Highly realistic with intricate details |
The Kuasting Alloy Mini Racing Bike Model Cake Topper Black instantly caught my eye with its highly realistic bicycle design, showcasing intricate details that make it feel almost alive. Measuring 8 by 5 inches with a height of just over 2 inches, it’s the perfect compact size to sit on your desk without overwhelming your space.
What stands out are the flexible rolling wheels and smooth steering, which really do provide an authentic riding experience. The handlebars turn left and right, and the pedal drives the rear wheel via a belt, mimicking a real mountain bike—something kids and collectors alike will appreciate. The stand support is adjustable, adding to its realistic charm and versatility. When comparing different best road bike tricks options, this model stands out for its quality.
Overall, the Kuasting Alloy Mini Racing Bike Model is a delightful blend of craftsmanship and fun. Made from zinc alloys and plastics, it feels sturdy yet detailed enough for a delicate collection or a charming cake topper. Whether for play, display, or decoration, it offers a compact, high-quality piece that’s sure to impress.”
BV Road Bike Handlebar Tape, EVA Foam, Black/White, 2 Rolls

- ✓ Easy to install
- ✓ Excellent grip
- ✓ Comfortable padding
- ✕ White shows dirt
- ✕ Slightly thinner than some
| Material | Ultra-Light EVA Foam |
| Adhesive Backing | 3M adhesive for secure attachment |
| Design Features | Anti-slip surface for enhanced grip |
| Compatibility | Suitable for most road bike handlebars |
| Padding and Comfort | Reduces fatigue and pressure during long rides |
| Color Options | Black/White |
The moment I peeled back the packaging of the BV Road Bike Handlebar Tape, I noticed how sleek and lightweight it felt in my hands. The black and white design instantly caught my eye—classic but with a modern touch that looks great on any bike.
As I started wrapping it around my handlebars, I immediately appreciated the smooth application thanks to the 3M adhesive backing. It clung nicely without any fuss, and I didn’t need to fuss over perfect placement.
The EVA foam felt plush yet firm, giving a comfortable grip that I could feel even during longer rides.
What really stood out was the anti-slip design. Even when my palms got sweaty, the tape maintained its grip, making me feel much safer on sharp turns or sprints.
The foam also dampened road vibrations, so my hands didn’t go numb after a couple of hours on the road.
During extended rides, I noticed that the padding reduced fatigue, which is a lifesaver on hilly routes. The tape stayed in place, and I didn’t have to readjust it once.
Plus, it’s compatible with most bike bars, so no worries about size mismatches.
Honestly, installing this was straightforward, and it instantly upgraded my bike’s look and feel. The only minor issue was that the white section showed dirt more easily, but a quick wipe kept it looking fresh.
Overall, a solid upgrade for comfort and safety.
VEVOR 700C Road Bike Shimano 21-Speed City Commuter

- ✓ Smooth gear shifting
- ✓ Reliable disc brakes
- ✓ Comfortable riding position
- ✕ Slightly heavy frame
- ✕ Basic color options
| Frame | Carbon steel with internal cable routing |
| Drivetrain | Shimano 21-speed (3×7) gear system |
| Brakes | Disc braking system |
| Wheels | 700x28C with COMPASS-branded tires |
| Dimensions | 68 x 18 x 38 inches (1730 x 448 x 970 mm) |
| Weight | Estimated 12-14kg (based on similar steel frame road bikes) |
Imagine rolling out your new VEVOR 700C Road Bike on a chilly Saturday morning, pedals spinning smoothly as you weave through city streets. The moment you lift the bike, you notice its sturdy carbon steel frame—feeling solid yet surprisingly manageable to handle.
The sleek black finish and aerodynamic drop bars immediately make you feel ready for a quick urban adventure.
As you start riding, the 700x28C COMPASS tires grip the asphalt confidently, giving you a sense of control on uneven patches. Shifting through the 21-speed Shimano gears is effortless—each click transitions smoothly, whether you’re climbing a steep hill or cruising downhill.
The internal cable routing keeps everything tidy and quiet, avoiding annoying cable noise or snags.
The disc brakes respond quickly when you need to slow down or stop, even in wet conditions. You feel confident braking at high speeds, thanks to their precise and reliable performance.
Plus, the lightweight yet durable frame means less fatigue on longer rides, making your commute or weekend ride more enjoyable.
Assembly was surprisingly straightforward—just a few steps to attach the handlebar, saddle, and pedals, with clear instructions. The included tools made setup quick, and the front fork, once rotated 180°, felt aligned perfectly.
Overall, it’s a balanced mix of comfort, speed, and control, ideal for city commuting or spirited weekend rides.
If you’re after a reliable, easy-to-ride bike that handles urban tricks with ease, this VEVOR model ticks all the boxes. It’s a solid choice for anyone looking to elevate their road game without fussing over complicated assembly or costly upgrades.
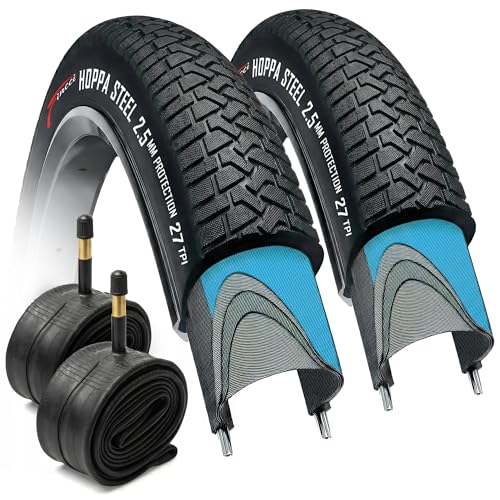
Fincci Hoppa BMX 20×2.10 Tire & 20″ Schrader Tube
- ✓ Easy to install
- ✓ Good grip and control
- ✓ Durable puncture protection
- ✕ Max 40 PSI
- ✕ Slightly narrow for some users
| Tire Size | 20×2.10 inches (ETRTO 56-406) |
| Tread Pattern | Semi-slick, non-directional |
| Maximum Pressure | 40 PSI |
| Construction | 27 TPI casing with foldable steel bead |
| Puncture Protection | 2.5mm puncture-resistant layer |
| Valve Type | Schrader |
Imagine you’re at the skatepark, eager to try out some new tricks on your BMX. You roll your bike over the cracked concrete, feeling the familiar jolt of uneven pavement under your wheels.
As you prepare to jump, you notice these Fincci Hoppa 20×2.10 tires mounted smoothly onto your rims, ready for action.
The semi-slick tread is just enough to grip the asphalt without feeling sluggish. You push off, and the tires roll effortlessly over rough patches, thanks to their 1.5mm puncture protection layer.
They handle quick turns and sharp corners in the park with surprising agility, making your tricks feel more controlled.
What really stands out is how easy they are to install—no fuss with special tools, just standard tire levers. The foldable steel bead ensures a snug fit on your BMX rims, giving you confidence during those high-impact stunts.
The tires also perform well on city streets, providing responsive handling for commuting or casual rides.
Durability is evident even after a few sessions; the casing feels tough, and the grip remains consistent. Whether you’re grinding on rails or cruising around neighborhoods, these tires seem built to last.
Overall, they strike a nice balance between street performance, ease of use, and durability, making them a versatile choice for any rider.
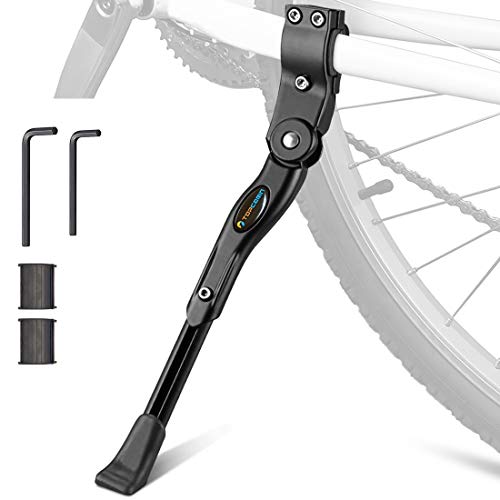
TOPCABIN Bike Kickstand Adjustable Aluminium Alloy Bicycle
- ✓ Durable aluminum alloy
- ✓ Fully adjustable length
- ✓ Non-slip rubber foot
- ✕ Might be too long for low-clearance bikes
- ✕ Needs careful tightening
| Material | Aluminum alloy with rust-resistant finish |
| Adjustable Length Range | 12.2 inches to 14.2 inches (310mm to 360mm) |
| Suitable Wheel Sizes | 22″, 24″, 26″, 27.5″, 28″ |
| Frame Compatibility | Oval tubes with diameters 15-30mm |
| Support Weight Capacity | Supports bikes with frame-to-ground clearance between 9.8 inches and 11.8 inches (25-30 cm) |
| Additional Features | Non-slip reinforced rubber foot, waterproof and wear-resistant |
Many people assume that a bike kickstand is just a simple accessory that doesn’t need much thought. But after installing this TOPCABIN adjustable aluminium alloy kickstand, I realized how crucial proper fit and stability really are.
A poorly fitting stand can turn a quick stop into a balancing act, especially on uneven ground.
This model feels sturdy right out of the box. The aluminum alloy construction is lightweight yet strong, and the anti-slip rubber foot really grips wet or muddy surfaces without sinking.
I love how adjustable it is—being able to set the length between 12.2 and 14.2 inches makes it compatible with a variety of bikes, from 22” to 28” wheels.
Installation is straightforward. The kit includes two hex keys, so I was able to attach it in minutes.
Just be careful not to overtighten the screws, or you might strip the threads. The wrench makes length adjustment super easy, and I appreciated how smoothly it moved along the oval tube frame, which is common on many bikes.
Measuring frame-to-ground clearance before installing is a smart move. I found that as long as your bike’s clearance is between 9.8 and 11.8 inches, this stand will work perfectly.
It keeps my bike upright on gravel and uneven pavement, which is a real plus for daily commuting and off-road rides.
The only minor downside is that for very low-clearance bikes, it might be a bit too long. But overall, it’s reliable, weather-resistant, and easy to adjust, making it a great upgrade for almost any bike.
What Are the Best Tricks to Master on a Road Bike?
- Track Stand: The track stand is a balancing trick that allows a cyclist to remain stationary without putting a foot down. This skill is particularly useful at stoplights or in tight group rides, as it demonstrates control and can help preserve momentum when starting again.
- Descending Techniques: Mastering descending techniques involves proper weight distribution and cornering skills while going downhill. By leaning into the bike and keeping your body low, you can maintain speed and stability, ultimately increasing confidence on descents.
- One-Handed Riding: Riding with one hand is a useful trick for signaling or reaching for items like water bottles. This skill requires balance and body positioning, and it can help cyclists become more comfortable on their bike while enhancing their overall handling skills.
- Wheelies: Although more common in mountain biking, wheelies can also be practiced on road bikes for fun and to improve balance. This trick not only showcases bike handling but also strengthens core muscles, as it requires engaging your body to lift the front wheel while maintaining control.
- Cornering Techniques: Effective cornering is crucial for maintaining speed and safety during turns. Learning how to shift your weight appropriately and using your body to lean into corners can significantly improve your handling, allowing for faster and more controlled turns.
- Emergency Braking: Mastering emergency braking involves practicing braking techniques to stop quickly and safely in unexpected situations. Proper use of both front and rear brakes, along with body positioning, can prevent accidents and enhance your overall riding skills.
- Group Riding Skills: Developing group riding skills, such as riding in a paceline or drafting, helps improve efficiency and speed in a group setting. Learning how to communicate with others and maintain a steady pace while close to other cyclists is essential for safe and enjoyable group rides.
How Can You Successfully Perform a Bunny Hop on a Road Bike?
Performing a Bunny Hop on a road bike requires skill and practice to master the technique.
- Proper Body Positioning: Start by ensuring your body is in the correct position, with your knees slightly bent and your hands firmly on the handlebars. This stance helps you maintain balance and prepares you to shift your weight effectively during the hop.
- Weight Shift: As you prepare to hop, crouch down slightly to compress the bike’s suspension and gather momentum. Quickly shift your weight back and down to lift the front wheel off the ground while simultaneously pulling up on the handlebars.
- Using Your Legs: As the front wheel rises, extend your legs and push down on the pedals to lift the rear wheel. This coordinated effort is crucial for achieving height and ensuring both wheels clear the obstacle.
- Timing and Coordination: The success of a Bunny Hop relies heavily on your timing and the coordination of your movements. Practice the timing of your weight shift and the leg extension to ensure that both wheels leave the ground simultaneously for a clean execution.
- Practice on Flat Ground: Start practicing on flat, open areas without obstacles to build your confidence. As you become more comfortable, gradually introduce small obstacles to hop over, ensuring that you maintain control and balance throughout the trick.
- Safety Gear: Always wear appropriate safety gear, including a helmet and padded clothing, while practicing tricks like the Bunny Hop. This gear can protect you from injuries in case of falls or miscalculations during your practice sessions.
What Are the Techniques for Executing a Wheelie on a Road Bike?
The techniques for executing a wheelie on a road bike include:
- Body Positioning: Proper body positioning is crucial for maintaining balance and control during a wheelie. Riders should lean slightly back while keeping their arms stiff, allowing their body weight to shift to the rear wheel, which helps lift the front wheel off the ground.
- Pedal Technique: Effective pedal technique involves a sudden and strong push on the pedals to generate enough power. Riders should start by pedaling at a moderate speed and then apply a quick, forceful pedal stroke while pulling on the handlebars to initiate the lift.
- Throttle Control: Throttle control refers to the rider’s ability to manage the power output and balance during the wheelie. By modulating the pedal pressure and adjusting their body weight, riders can maintain the wheelie for longer periods without losing balance or crashing.
- Practice and Progression: Like any trick, practice is essential for mastering the wheelie. Riders should start on flat, open areas and gradually increase difficulty by practicing at higher speeds or on slight inclines to build confidence and skill before attempting more complex maneuvers.
How Do You Achieve a Perfect Track Stand on a Road Bike?
Achieving a perfect track stand on a road bike involves mastering balance and control while in a stationary position.
- Body Positioning: Your body should be positioned over the bike with a slight forward lean, keeping your weight centered. This helps maintain equilibrium and allows for quick adjustments to your balance.
- Pedal Placement: Position your pedals horizontally, with one pedal at the 2 o’clock position and the other at the 8 o’clock position. This setup provides maximum leverage and control to push down and stabilize the bike.
- Steering Control: Use subtle movements of the handlebars to maintain balance while keeping your core engaged. Small adjustments in steering can help correct any shifts in weight that might cause you to lean too far in one direction.
- Brake Control: Gently apply the brakes to prevent the bike from rolling forward or backward. This control allows you to focus on balancing without worrying about movement, making it easier to hold the position.
- Practice and Patience: Achieving a perfect track stand takes time and consistent practice. Start on a flat surface and gradually increase your comfort level before trying it in more challenging environments.
- Footwear and Gear: Wearing appropriate cycling shoes can enhance your grip on the pedals, providing better stability. Additionally, ensuring your bike is well-maintained with proper tire pressure can help achieve a smoother track stand.
What Steps Will Help You Master a Manual on a Road Bike?
To master a manual on a road bike, several effective steps can be taken:
- Proper Bike Setup: Ensure your bike is appropriately fitted to your body size and riding style. A well-fitted bike enhances control and comfort, making it easier to learn and execute tricks.
- Develop Core Strength: Building core strength is crucial as it provides stability and balance while performing tricks. Engaging in exercises that target the core will help you maintain control over the bike during maneuvers.
- Practice Balance Techniques: Spend time practicing balance techniques such as track stands and wheelies. These foundational skills will improve your overall bike handling and help you feel more confident when attempting to manual.
- Learn the Timing: Understanding the timing of weight shifts and pedal strokes is key to successfully performing a manual. Practicing the motion repeatedly will help you develop muscle memory, making the trick more intuitive.
- Start on Flat Ground: Begin practicing your manual on flat, open ground to minimize the risk of falling. This allows you to focus on the technique without worrying about obstacles or steep inclines.
- Use Visual Aids: Watching tutorial videos or observing experienced riders can provide valuable insights into the mechanics of a manual. Visual learning can help you grasp the nuances of body positioning and bike movement.
- Practice Consistently: Regular practice is essential for mastering any trick. Set aside dedicated time to work on your manual, and be patient with your progress as you improve over time.
- Seek Feedback: Riding with friends or joining a cycling group allows you to receive constructive feedback on your technique. Other riders can offer tips and encouragement, which can significantly enhance your learning experience.
What Challenges Should You Be Aware of When Attempting Road Bike Tricks?
When attempting road bike tricks, there are several challenges to consider:
- Balance: Maintaining balance is crucial for executing tricks successfully. A slight shift in weight can lead to a fall, so it’s important to practice your core strength and bike control to achieve a stable ride.
- Speed Control: Many tricks require precise speed control to ensure safety and success. Too much speed can make it difficult to perform the trick correctly, while too little can prevent you from getting enough lift or momentum.
- Terrain Awareness: The surface you practice on greatly affects the difficulty of tricks. Uneven, wet, or rough surfaces can increase the risk of accidents, so it’s advisable to practice on smooth, flat terrain before attempting tricks on varied surfaces.
- Risk of Injury: There is an inherent risk of injury when performing tricks, especially for beginners. Wearing appropriate safety gear, such as helmets and pads, is essential to protect yourself from falls and accidents.
- Trick Complexity: Some tricks are inherently more complex and may require advanced skills. It’s important to gradually build up your trick repertoire, starting with simpler maneuvers before progressing to more difficult ones to avoid frustration and injury.
- Equipment Limitations: Not all road bikes are designed for performing tricks. Certain designs and components may limit your ability to execute specific moves, so it’s important to know your bike’s capabilities and limitations.
How Can You Avoid Common Mistakes While Performing Tricks?
To avoid common mistakes while performing the best road bike tricks, it’s essential to focus on technique, safety, and practice.
- Mastering the Basics: Before attempting advanced tricks, ensure you have a solid foundation in basic cycling skills. This includes balance, braking, and cornering, which are crucial for safely executing more complex maneuvers.
- Proper Bike Setup: Check that your bike is well-maintained and properly adjusted for your size and riding style. A correctly fitted bike enhances control and stability, reducing the risk of accidents during tricks.
- Body Positioning: Maintain the correct body position during tricks to improve balance and control. Leaning your body forward or backward at the right angles can greatly affect the outcome of your trick.
- Progressive Learning: Start with simpler tricks and gradually progress to more difficult ones. This approach allows you to build confidence and skill incrementally, helping to prevent falls and injuries.
- Visualizing the Trick: Before attempting a trick, visualize the execution in your mind. This mental rehearsal can help you anticipate movements and improve your overall performance.
- Using Protective Gear: Always wear appropriate safety gear, such as a helmet, knee pads, and elbow pads. This will help mitigate injuries in case of falls or mistakes while practicing tricks.
- Practice in Safe Environments: Choose safe and controlled environments for practicing tricks, such as empty parking lots or bike parks. This minimizes distractions and hazards that could lead to accidents.
- Seeking Guidance: If possible, learn from experienced riders or instructors who can provide tips and feedback. Their insights can help you correct mistakes and improve your technique more effectively.
What Safety Gear Is Recommended for Practicing Road Bike Tricks?
When practicing road bike tricks, wearing the appropriate safety gear is crucial to minimize the risk of injury.
- Helmet: A properly fitted helmet is essential for protecting your head in case of falls or collisions. Look for a helmet that meets safety standards and offers ventilation for comfort during long sessions.
- Knee and Elbow Pads: These pads provide extra cushioning and protection for your joints during tricks that may lead to falls. They come in various styles, including soft and hard shell options, allowing for a balance between mobility and protection.
- Gloves: Wearing gloves can enhance grip on the handlebars while also protecting your hands in case of a fall. Look for gloves with padded palms and breathable fabric to keep your hands comfortable during practice.
- Wrist Guards: Wrist guards can help prevent injuries to your wrists, which are particularly vulnerable during falls or when performing tricks. These are especially beneficial for beginners who are still mastering their balance and control.
- Impact Shorts: These padded shorts can protect your hips and tailbone, areas that often take the brunt of falls. They are designed to be worn under your regular cycling shorts, providing discreet yet effective cushioning.
- Protective Eyewear: Sunglasses or goggles can protect your eyes from debris and wind while riding, enhancing visibility and comfort. Choose eyewear that offers UV protection and fits well to avoid distractions during your tricks.
- High-Visibility Clothing: Wearing bright or reflective clothing increases your visibility to others, which is particularly important if you practice in areas with traffic or other cyclists. Look for gear that incorporates reflective materials for added safety in low-light conditions.